在Blender 创建一个低多边形角色的绑定 Building A Basic Low Poly Character Rig In Blender
 在Blender 创建一个低多边形角色的绑定 Building A Basic Low Poly Character Rig In Blender
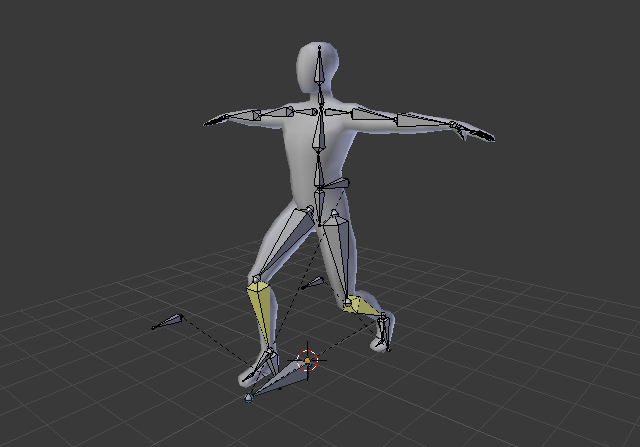
In this tutorial you will learn how to build a basic rigging system for a low poly character using Blender. Though blender has a Auto-Rigging system called Rigify for bipeds, one must first know how to set up an armature from scratch with Inverse Kinematics controls. You will also learn how to skin the armature to a model and paint weights.
在这个指南你将学习到如何使用Blender创建一个低多边形角色基本的绑定。虽然blender有一个自动的绑定系统 Rigify,首先必须知道怎么建立从头开始建立使用IK控制的骨架。你将也会学习到怎么蒙皮和绘制权重。
For the purpose of this tutorial I have used a base model which can be purchased on 3docean.
对于本教程的目的,我使用了一个基本模型,可以在3docean购买。
由Admin于周五 三月 27, 2015 8:29 pm进行了最后一次编辑,总共编辑了1次
 回复: 在Blender 创建一个低多边形角色的绑定 Building A Basic Low Poly Character Rig In Blender
Step 1
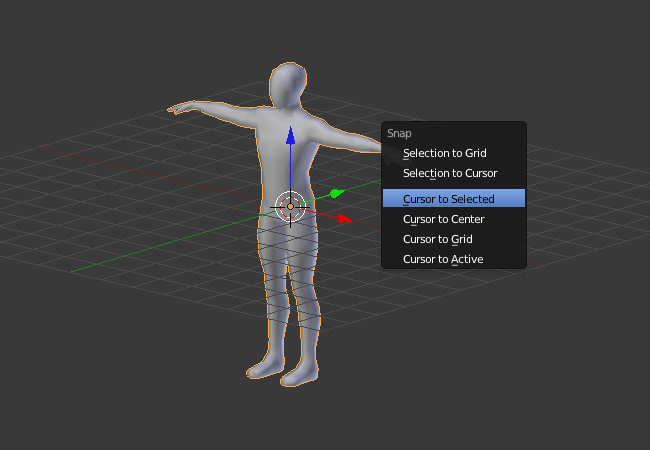
Open a new file and import the base model (File > Import.) You can use any other biped model as well. Right click and select the model, press Alt+G to clear its location, so that it is placed at the center. With the model selected, press Shift+S and then select "Cursor to Selected" to bring the 3D cursor to the origin of the model. Whenever we add a new object, it appears wherever the cursor is. Don't worry if your model's center point is at the bottom near the feet unlike in this tutorial.
打开一个新文件并导入基本模型(File > Import.) 你可以使用任何其他的两足模型。右键选择模型,按Alt+G清除它的位置信息,以至于它被放置到中心。保持模型选择按 Shift+S然后选择"Cursor to Selected" 将3D光标放置到模型的原点。每当我们添加一个新物体,它就出现在光标所在地。不要担心如果你的模型的中心点是在靠近脚底不像在本教程的。

由Admin于周五 三月 27, 2015 8:31 pm进行了最后一次编辑,总共编辑了1次
 回复: 在Blender 创建一个低多边形角色的绑定 Building A Basic Low Poly Character Rig In Blender
由Admin于周五 三月 27, 2015 8:32 pm进行了最后一次编辑,总共编辑了1次
 回复: 在Blender 创建一个低多边形角色的绑定 Building A Basic Low Poly Character Rig In Blender
Step 3
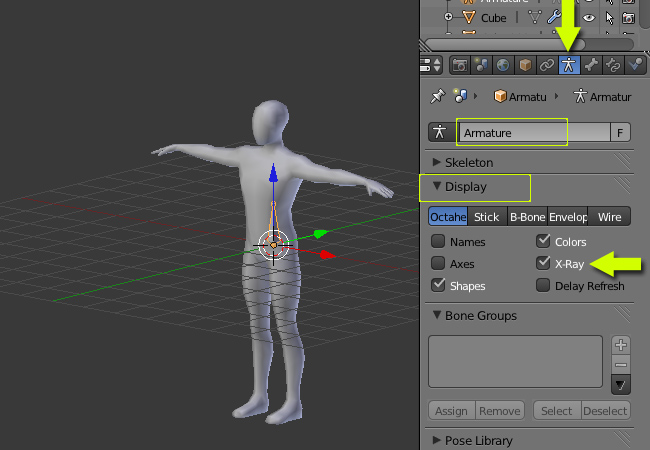
To make the armature visible in shaded view mode, click on the Armatures Tab, in the Display Panel turn on X ray. This will enable us to see armatures through the model. You can also rename your new armature object.
要确保在shaded 视图模式骨架可见,点击Armatures选项卡,在Display面板打开X ray。这将使我们透过模型看到骨架。你也可以重命名你的新骨架(armature)物体。

由Admin于周五 三月 27, 2015 8:33 pm进行了最后一次编辑,总共编辑了1次
 回复: 在Blender 创建一个低多边形角色的绑定 Building A Basic Low Poly Character Rig In Blender
Step 4
Press 3 on the Numpad to get into the sideview. With the Armature object selected, press TAB to enter into Edit mode. Just as an object's geometry is edited with the TAB key, armature object's bones can also be edited with the TAB key (edit mode.) In edit mode, select the bone by Right clicking and move it a ways back as shown below.
按数字键3切换到侧视图。保持骨架(Armature)物体选择,按TAB键进入编辑模式。正如一个几何体编辑使用TAB键,骨架对象的骨头,也可以用TAB键(编辑模式。 )在编辑模式下编辑,选择骨骼右击并移动它,如下图所示。
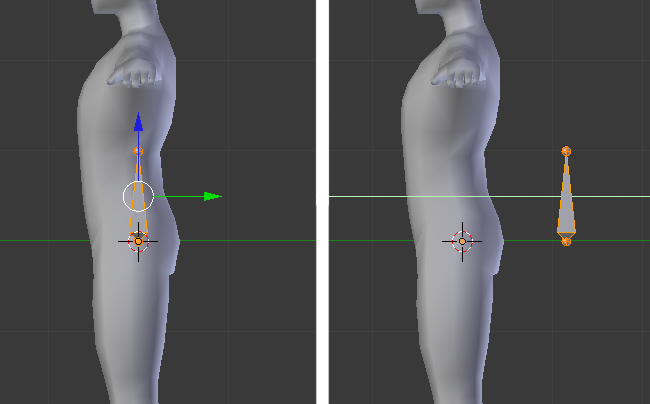
Rotate it 90 degrees so that the tip of the bone is inside the body. Place the bone just around the waist line. Remember that we are in edit mode to do all the editing.
旋转骨骼90度让骨骼尖端在身体内部。放置骨骼到腰部线的周围。记住,我们要在编辑模式下做所有的编辑。
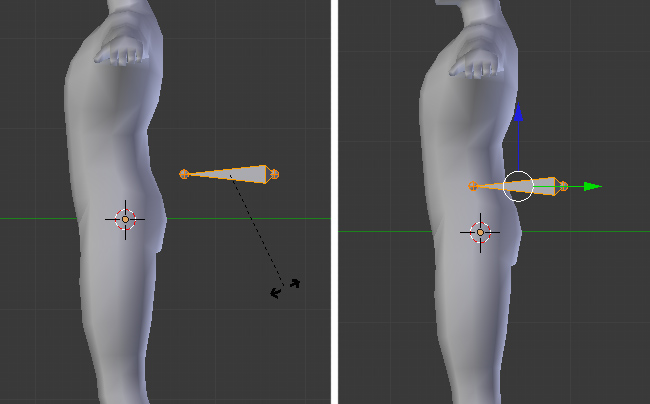
Press 3 on the Numpad to get into the sideview. With the Armature object selected, press TAB to enter into Edit mode. Just as an object's geometry is edited with the TAB key, armature object's bones can also be edited with the TAB key (edit mode.) In edit mode, select the bone by Right clicking and move it a ways back as shown below.
按数字键3切换到侧视图。保持骨架(Armature)物体选择,按TAB键进入编辑模式。正如一个几何体编辑使用TAB键,骨架对象的骨头,也可以用TAB键(编辑模式。 )在编辑模式下编辑,选择骨骼右击并移动它,如下图所示。

Rotate it 90 degrees so that the tip of the bone is inside the body. Place the bone just around the waist line. Remember that we are in edit mode to do all the editing.
旋转骨骼90度让骨骼尖端在身体内部。放置骨骼到腰部线的周围。记住,我们要在编辑模式下做所有的编辑。

由Admin于周五 三月 27, 2015 8:34 pm进行了最后一次编辑,总共编辑了1次
 回复: 在Blender 创建一个低多边形角色的绑定 Building A Basic Low Poly Character Rig In Blender
Step 5
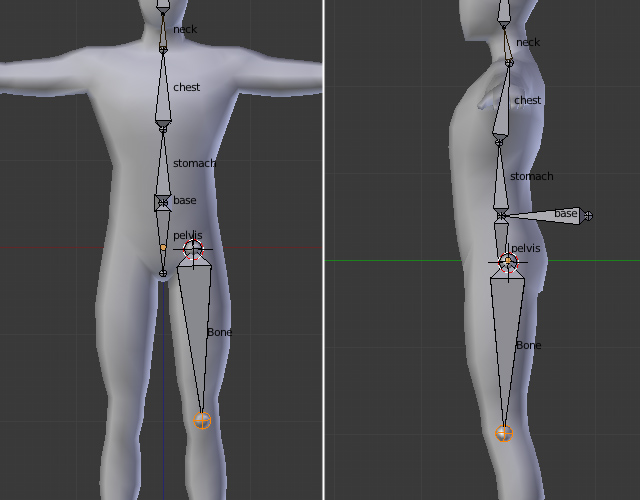
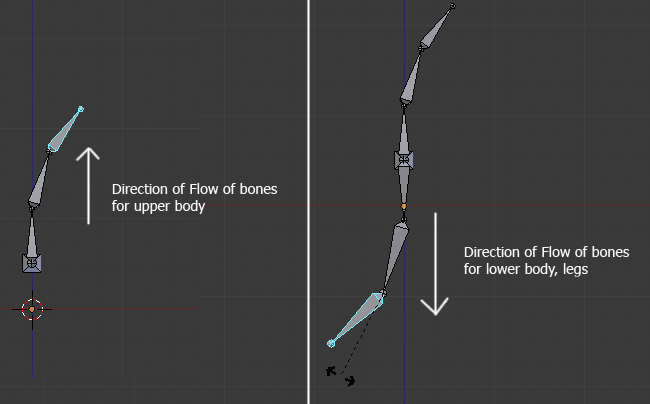
Now before going further we must understand the direction of rotation for the bones in human body. All the bones from the lower back to head have the rotation center (pivot point) at their base (bottom.) Also the top bone is the child of the lower bone e.g. the head is the child of neck, which is further a child of the chest and so on.
在我们继续前,我们必须理解人类身体的骨骼方向。所有的骨骼都从较低的背部到头部以它们的基底 (bottom.) 为旋转中心的 (pivot point)。也就是顶部骨骼是较低骨骼的子骨骼,例如头是颈部的子骨骼,还是更远的胸腔的子骨骼等等。
This means if we rotate or move the lower bone, its child will also be affected. However if we move or rotate a child bone, the parent bone is not affected. The direction of flow is downwards from the pelvis to the feet. So the bone we just created is the parent most bone from which bones for both direction will be extruded. The image below is just for understanding, you don't have to recreate this.
这意味着如果我们旋转较低的骨骼,它的子骨骼都受到影响。然而如果我移动或旋转一个子骨骼,父骨骼是不受影响的。从骨盘到脚的方向是向下流动的。所以我们刚刚创建的骨骼的常常是来自连个方向挤出的骨骼的父骨骼。下面的图片是只为理解,你不必重新创建。

由Admin于周五 三月 27, 2015 8:34 pm进行了最后一次编辑,总共编辑了1次
 回复: 在Blender 创建一个低多边形角色的绑定 Building A Basic Low Poly Character Rig In Blender
由Admin于周五 三月 27, 2015 8:35 pm进行了最后一次编辑,总共编辑了1次
 回复: 在Blender 创建一个低多边形角色的绑定 Building A Basic Low Poly Character Rig In Blender
由Admin于周五 三月 27, 2015 8:36 pm进行了最后一次编辑,总共编辑了1次
 回复: 在Blender 创建一个低多边形角色的绑定 Building A Basic Low Poly Character Rig In Blender
由Admin于周五 三月 27, 2015 8:36 pm进行了最后一次编辑,总共编辑了1次
 回复: 在Blender 创建一个低多边形角色的绑定 Building A Basic Low Poly Character Rig In Blender
Step 9
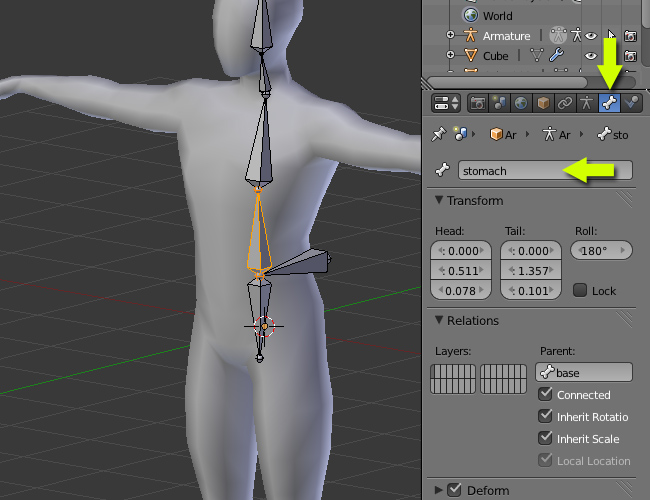
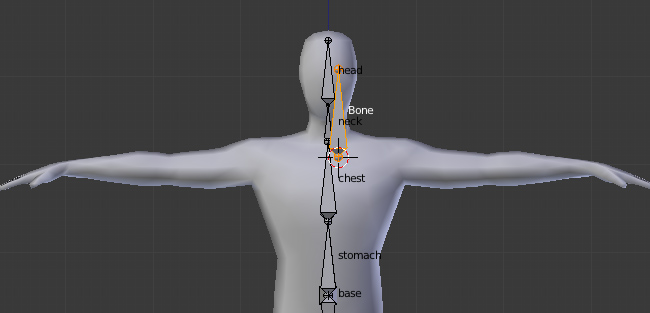
Now we must rename all the bones. Select a bone (in the edit mode) and click on the Bone properties and then rename it. Do it for all bones - pelvis, stomach, chest, neck and head. For the first bone I have named it Base.
现在,我们必须重新命名所有的骨骼。选择一个骨骼(在编辑模式下) ,然后单击骼骨属性,然后将其重命名。所有的骨骼都这样做 - 骨盆,腹部,胸部,颈部和头部。对于第一个骨骼我把它命名为Base(基础)。
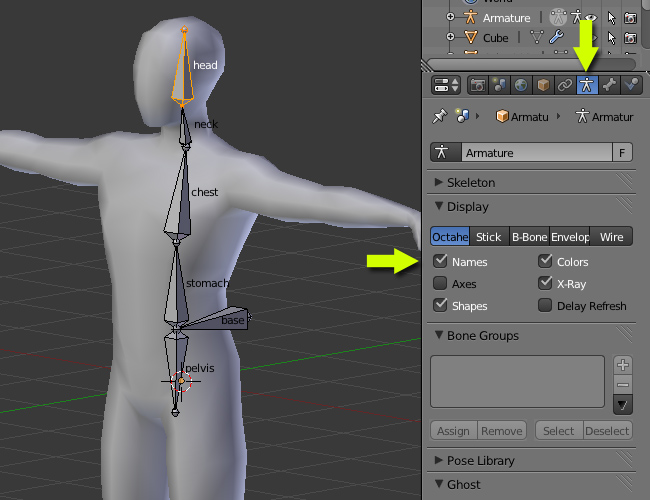
Optional: To see the names in the 3D view, open the armature properties and under the display panel click on Names.
选项:要在3D视图看见骨骼名字,打开armature(骨架)属性在display面板下点击Names.
Now we must rename all the bones. Select a bone (in the edit mode) and click on the Bone properties and then rename it. Do it for all bones - pelvis, stomach, chest, neck and head. For the first bone I have named it Base.
现在,我们必须重新命名所有的骨骼。选择一个骨骼(在编辑模式下) ,然后单击骼骨属性,然后将其重命名。所有的骨骼都这样做 - 骨盆,腹部,胸部,颈部和头部。对于第一个骨骼我把它命名为Base(基础)。

Optional: To see the names in the 3D view, open the armature properties and under the display panel click on Names.
选项:要在3D视图看见骨骼名字,打开armature(骨架)属性在display面板下点击Names.

由Admin于周五 三月 27, 2015 8:37 pm进行了最后一次编辑,总共编辑了1次
 回复: 在Blender 创建一个低多边形角色的绑定 Building A Basic Low Poly Character Rig In Blender
由Admin于周五 三月 27, 2015 8:38 pm进行了最后一次编辑,总共编辑了1次
 回复: 在Blender 创建一个低多边形角色的绑定 Building A Basic Low Poly Character Rig In Blender
由Admin于周五 三月 27, 2015 8:41 pm进行了最后一次编辑,总共编辑了1次
 回复: 在Blender 创建一个低多边形角色的绑定 Building A Basic Low Poly Character Rig In Blender
由Admin于周五 三月 27, 2015 8:41 pm进行了最后一次编辑,总共编辑了1次
 回复: 在Blender 创建一个低多边形角色的绑定 Building A Basic Low Poly Character Rig In Blender
由Admin于周五 三月 27, 2015 8:42 pm进行了最后一次编辑,总共编辑了1次
 回复: 在Blender 创建一个低多边形角色的绑定 Building A Basic Low Poly Character Rig In Blender
Step 14
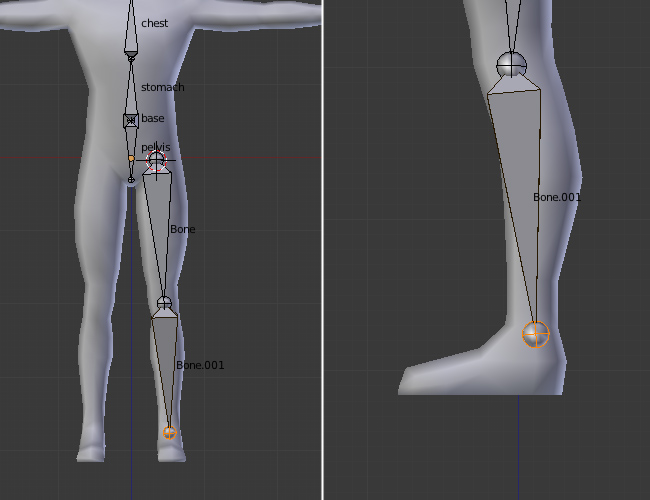
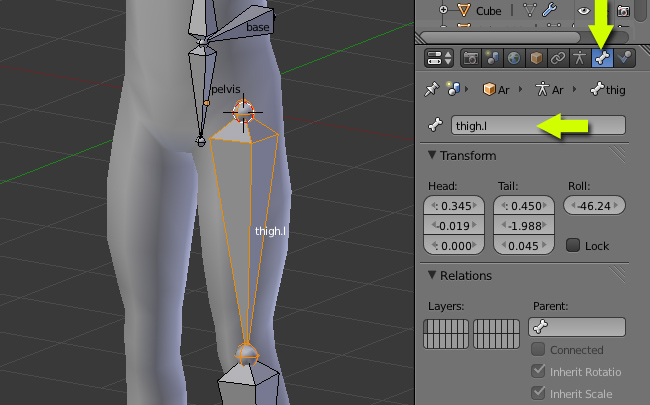
Now right click on the thigh bone to select it. In the Bone properties toolbar, rename the bone to thigh.l with a .L extension. This way blender will recognize the bone as left or right, *** it easy for posing and editing in mirror symmetry later.
现在,右键点击选择大腿骨。在骨骼属性工具栏,重命名骨骼为thigh.l 。这样blender可以识别出左边或右边,使它更容易在镜像后编辑和调整姿势。
Similarly name the rest of the bones with anything you like but with a .L extension - lowerleg.l, foot.l and finally toe.l.
同样的用你喜欢的名字重命名其它的骨骼但要加.L 后缀--lowerleg.l, foot.l 和finally toe.l。
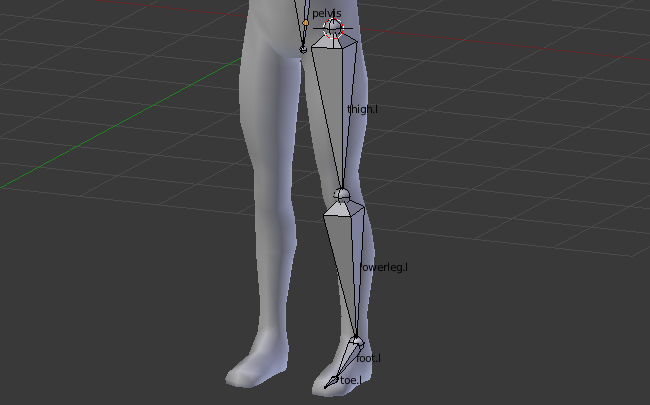
Now right click on the thigh bone to select it. In the Bone properties toolbar, rename the bone to thigh.l with a .L extension. This way blender will recognize the bone as left or right, *** it easy for posing and editing in mirror symmetry later.
现在,右键点击选择大腿骨。在骨骼属性工具栏,重命名骨骼为thigh.l 。这样blender可以识别出左边或右边,使它更容易在镜像后编辑和调整姿势。

Similarly name the rest of the bones with anything you like but with a .L extension - lowerleg.l, foot.l and finally toe.l.
同样的用你喜欢的名字重命名其它的骨骼但要加.L 后缀--lowerleg.l, foot.l 和finally toe.l。

由Admin于周五 三月 27, 2015 8:43 pm进行了最后一次编辑,总共编辑了1次
 回复: 在Blender 创建一个低多边形角色的绑定 Building A Basic Low Poly Character Rig In Blender
Step 15
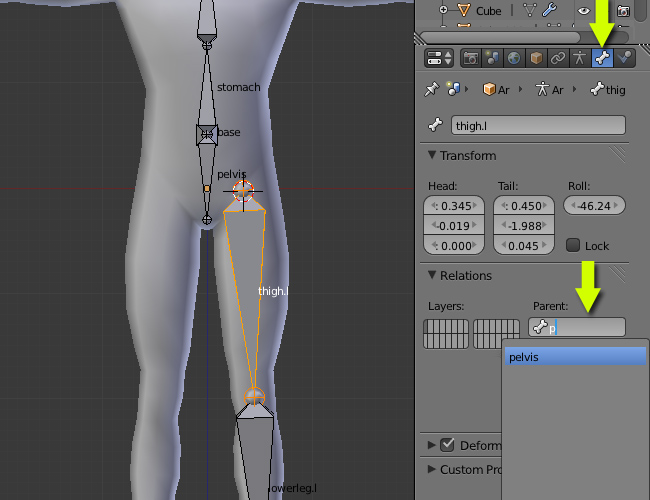
Select the thigh.l bone and in the Bone properties toolbar, under the Relations panel, set Parent to the pelvis bone. Now the thigh bone is a child of the pelvis bone. Make sure the Connected check box is unchecked, as we don't want these bones to be connected together, just follow the parent-child relationship. Alternatively you can parent it with the Ctrl+P command. Select the thigh bone first and then the pelvis and press Ctrl+P to make it a parent. Select keep offset when asked.
选择thigh.l骨骼,在骨骼属性面板工具栏,Relations面板下,选择Parent (父骨骼)为 pelvis (骨盆)。现在thigh(大腿骨)是pelvis (骨盆)的子骨骼。确保取消Connected 勾选,因为我们不想要这些骨骼连接在一起,仅仅需要的是父子关系。你可以使用parent 或命令Ctrl+P 。首先选择thigh(大腿骨),然后选择 pelvis (骨盆)并按Ctrl+P ,建立父子关系。然后选择 keep offset 选项。

由Admin于周五 三月 27, 2015 8:44 pm进行了最后一次编辑,总共编辑了1次
 回复: 在Blender 创建一个低多边形角色的绑定 Building A Basic Low Poly Character Rig In Blender
Step 16
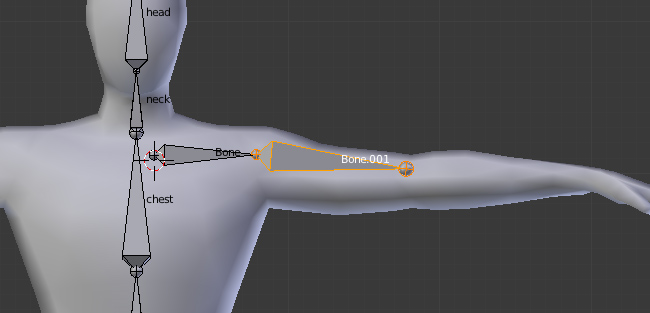
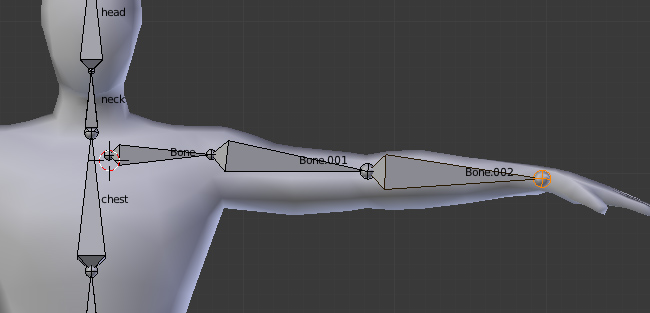
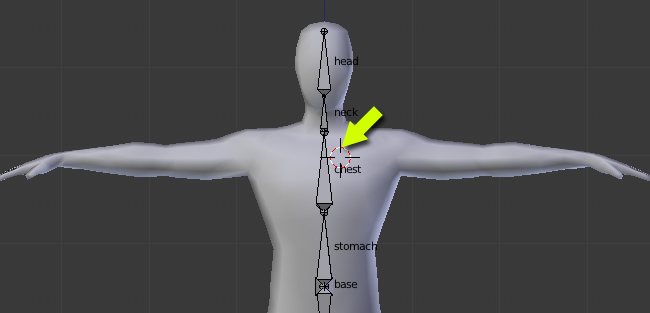
Press 1 on the numpad to get into the Front view. Left-click on the left side of the chest, just below the neck, on a point where you want to start the collar bone
按数字键1切换到前视图。在胸腔(chest)的左边点击,颈部的正下方,在这个点你将要开始创建collar(肩胛)骨骼。
Press Shift+A to create a bone.
按Shift + A来创建骨骼。
Select the tip of the new bone and press G to move it right on the shoulder.
选择新创建的骨骼的末端按G键将它移到右侧的肩膀。
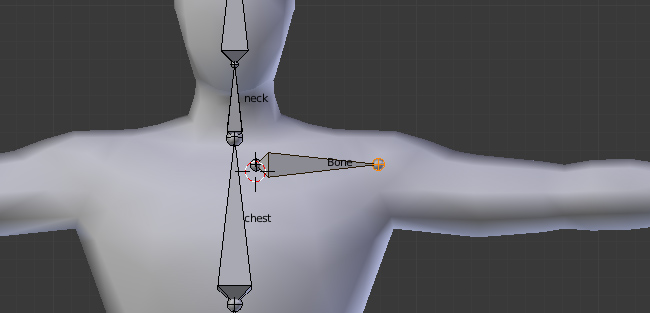
Press 1 on the numpad to get into the Front view. Left-click on the left side of the chest, just below the neck, on a point where you want to start the collar bone
按数字键1切换到前视图。在胸腔(chest)的左边点击,颈部的正下方,在这个点你将要开始创建collar(肩胛)骨骼。

Press Shift+A to create a bone.
按Shift + A来创建骨骼。

Select the tip of the new bone and press G to move it right on the shoulder.
选择新创建的骨骼的末端按G键将它移到右侧的肩膀。

由Admin于周五 三月 27, 2015 8:45 pm进行了最后一次编辑,总共编辑了1次
 回复: 在Blender 创建一个低多边形角色的绑定 Building A Basic Low Poly Character Rig In Blender
由Admin于周五 三月 27, 2015 8:46 pm进行了最后一次编辑,总共编辑了1次
 回复: 在Blender 创建一个低多边形角色的绑定 Building A Basic Low Poly Character Rig In Blender
由Admin于周五 三月 27, 2015 8:47 pm进行了最后一次编辑,总共编辑了1次
 回复: 在Blender 创建一个低多边形角色的绑定 Building A Basic Low Poly Character Rig In Blender
由Admin于周五 三月 27, 2015 8:48 pm进行了最后一次编辑,总共编辑了1次
 回复: 在Blender 创建一个低多边形角色的绑定 Building A Basic Low Poly Character Rig In Blender
由Admin于周五 三月 27, 2015 8:49 pm进行了最后一次编辑,总共编辑了1次
 回复: 在Blender 创建一个低多边形角色的绑定 Building A Basic Low Poly Character Rig In Blender
由Admin于周五 三月 27, 2015 8:50 pm进行了最后一次编辑,总共编辑了1次
 回复: 在Blender 创建一个低多边形角色的绑定 Building A Basic Low Poly Character Rig In Blender
Step 22
Now select all the Finger bones while holding Shift and then right clicking them individually, or by using the B key and drag selecting all of them. Press Shift+D to duplicate the set and move the mouse to place them on another finger. Adjust the tips to match the finger joints. Duplicate the set again for the rest of the fingers.
现在选择所有的手指骨,同时按住Shift键,然后右键分别单击选择它们,或使用 B 键拖动选择它们。按Shift + D复制和鼠标移动把它们放置在另一个手指。调整以匹配到手指关节。在复制剩下的手指。
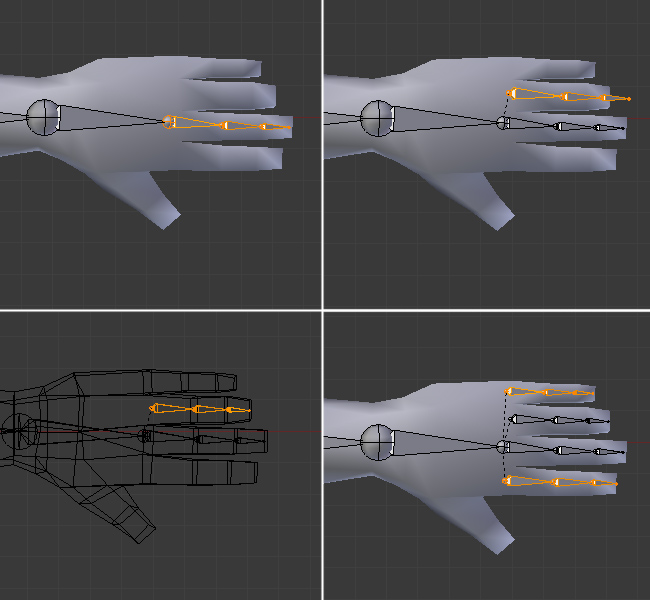
You will notice that the new duplicated sets are already a child of the palm bone, as the first finger set was the child from which we duplicated the new ones.
你也注意到新复制的手指骨是手掌骨骼的子骨骼,新的手指骨骼子骨骼属性复制自第一个手指骨。
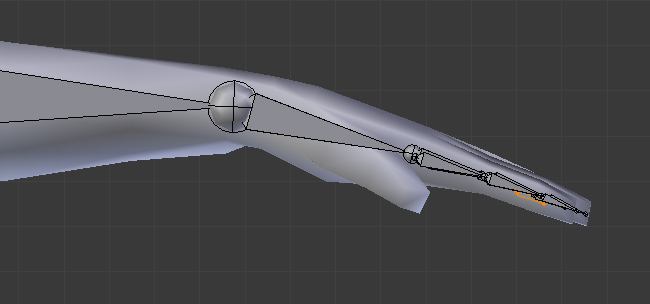
Check from the side view also.
在侧视图检查。
Now select all the Finger bones while holding Shift and then right clicking them individually, or by using the B key and drag selecting all of them. Press Shift+D to duplicate the set and move the mouse to place them on another finger. Adjust the tips to match the finger joints. Duplicate the set again for the rest of the fingers.
现在选择所有的手指骨,同时按住Shift键,然后右键分别单击选择它们,或使用 B 键拖动选择它们。按Shift + D复制和鼠标移动把它们放置在另一个手指。调整以匹配到手指关节。在复制剩下的手指。

You will notice that the new duplicated sets are already a child of the palm bone, as the first finger set was the child from which we duplicated the new ones.
你也注意到新复制的手指骨是手掌骨骼的子骨骼,新的手指骨骼子骨骼属性复制自第一个手指骨。
Check from the side view also.
在侧视图检查。

由Admin于周五 三月 27, 2015 8:53 pm进行了最后一次编辑,总共编辑了2次
 回复: 在Blender 创建一个低多边形角色的绑定 Building A Basic Low Poly Character Rig In Blender
由Admin于周五 三月 27, 2015 8:54 pm进行了最后一次编辑,总共编辑了1次
 回复: 在Blender 创建一个低多边形角色的绑定 Building A Basic Low Poly Character Rig In Blender
由Admin于周五 三月 27, 2015 8:59 pm进行了最后一次编辑,总共编辑了1次
您在这个论坛的权限:
您不能在这个论坛回复主题


