在Blender使用 Cycles创建一个静物写生场景Create And Render A Still Life Scene In Blender, Using Cycles
 在Blender使用 Cycles创建一个静物写生场景Create And Render A Still Life Scene In Blender, Using Cycles

Today, we'll have a brief introduction to Blender's new rendering engine - Cycles. This tutorial will cover modeling a small and easy still life scene, setting up different types of materials used in cycles and then finally lighting and rendering the scene.
今天我们主要介绍Blender新的渲染引擎--Cycles.这个指南将包括简单的建模和静物写生场景,使用cycles建立不同类型的材质,然后建立灯光并渲染场景。
 回复: 在Blender使用 Cycles创建一个静物写生场景Create And Render A Still Life Scene In Blender, Using Cycles
Step 1
First we'll create a simple scene, starting with the tea set. Delete all default objects in a new file, press Shift+A and add a Cylinder. With the cylinder selected, in the Tool shelf's (press T if it is hidden) command panel, reduce the number of vertices to 16.
首先我们创建一个简单的场景,首先从茶具开始。在一个新的文件删除所有的默认物体,按Shift+A 添加一个圆柱体(Cylinder)。选择圆柱体,在工具架(快捷键T)命令面板,将顶点数量减少到16。

 回复: 在Blender使用 Cycles创建一个静物写生场景Create And Render A Still Life Scene In Blender, Using Cycles
Step 2
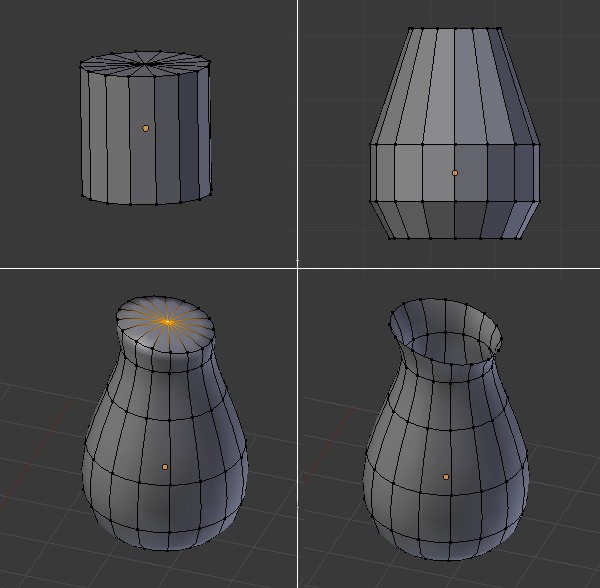
Press 3 on the Numpad to get into the side view. Toggle off the perspective view with the 5 key on the numpad. Select the cylinder and press TAB to enter into Edit mode. Press Z to enter wireframe mode so that we can select and edit the vertices behind, Press B to drag select the bottom vertices and then Press S and scale them down.
按数字键3切换到侧视图。关闭透视图按数字键5。选择圆柱体(Cylinder),按Tab键进入编辑模式。按Z键进入网格显示模式以至于我们可以编辑和选择后面的顶点,按B键拖动选择底部的顶点并按S键移动鼠标向下缩放它。

 回复: 在Blender使用 Cycles创建一个静物写生场景Create And Render A Still Life Scene In Blender, Using Cycles
Step 4
With all the new loops selected, press S to scale them. Select the loops individually with Alt+Right Click and scale them to create a nice cup shape. Select the whole mesh with the A key and then press S, and then Z to scale them down along the Z axis.
选择所有新的边,按S键缩放它们。选择单独的循环边使用Alt+右键点击并缩放它们创建一个很好的杯子造型,使用A键选择整个网格体,然后按S键,Z键沿着Z轴缩放它。

 回复: 在Blender使用 Cycles创建一个静物写生场景Create And Render A Still Life Scene In Blender, Using Cycles
Step 6
Select all vertices with A key and then press E to extrude them, press the ESC key or right click to confirm the position of the new vertices. Press S and scale them down. Move the selected new vertices upward, to give thickness to the cup.
使用A键选择所有的顶点,然后按E键挤出它们,按ESC键或右键点击确认新顶点位置。按S键向下缩小它们。移动新的顶点向上,给出杯子的厚度。

 回复: 在Blender使用 Cycles创建一个静物写生场景Create And Render A Still Life Scene In Blender, Using Cycles
Step 14
Select the top most edge loop with Alt+Right click. Press E to extrude and Right click (or hit ESC) to confirm the position. Press E again to extrude the selected loop and then Right click again to leave the new vertices in the same position. With the new loop selected, press S and scale them down to form the base of the lid.
使用Alt+鼠标右键选择最顶部的循环边,按E键挤出,然后鼠标右键点击(或按ESC键)确认位置。按E键再次挤出选择的边,然后右键在同样的位置点击。保持新的循环边被选择,按S键鼠标向下移动缩小它们作为盖子的基底。

 回复: 在Blender使用 Cycles创建一个静物写生场景Create And Render A Still Life Scene In Blender, Using Cycles
Step 15
Using the same extrude and scale method, we create the lid. Here the lid is modeled in a way that it is a part of the same mesh. First extrude the loop, then scale it to shape, then repeat this process until you reach the desired shape. To close the mesh, select the last loop and press Alt+M and then select "At Center". This will merge all the vertices in the center.
使用同样的挤出和缩放方法,我们创建出盖子。这里的盖子是相同的网格的一部分建模。首先挤出循环边,然后缩放它们,然后重复这个过程,直到达到所需的形状。要合并网格,选择最后循环边,按Alt+M键,然后选择"At Center".这将所有选择的顶点合并到中心。

Finally, Tweak the loops to get a nice shape. You can add more loops if you wish.
最后,调整循环得到一个不错的形状。如果你愿意你可以添加更多的循环。

Using the same extrude and scale method, we create the lid. Here the lid is modeled in a way that it is a part of the same mesh. First extrude the loop, then scale it to shape, then repeat this process until you reach the desired shape. To close the mesh, select the last loop and press Alt+M and then select "At Center". This will merge all the vertices in the center.
使用同样的挤出和缩放方法,我们创建出盖子。这里的盖子是相同的网格的一部分建模。首先挤出循环边,然后缩放它们,然后重复这个过程,直到达到所需的形状。要合并网格,选择最后循环边,按Alt+M键,然后选择"At Center".这将所有选择的顶点合并到中心。

Finally, Tweak the loops to get a nice shape. You can add more loops if you wish.
最后,调整循环得到一个不错的形状。如果你愿意你可以添加更多的循环。

 回复: 在Blender使用 Cycles创建一个静物写生场景Create And Render A Still Life Scene In Blender, Using Cycles
Step 16
Select the two front faces and extrude out the spout. Add an edge loop at the base to give some crease, and adjust the loops to give it a round shape.
选择前面两个面并挤出喷嘴。在基底添加一段循环边得到更好的折痕,调整循环边成圆形。

Delete the closed faces and then Extrude the loops and scale them down to give it thickness and a bevel.
删除封闭的面,然后挤出循环和缩小给它厚度和一个斜面。

Select the two front faces and extrude out the spout. Add an edge loop at the base to give some crease, and adjust the loops to give it a round shape.
选择前面两个面并挤出喷嘴。在基底添加一段循环边得到更好的折痕,调整循环边成圆形。

Delete the closed faces and then Extrude the loops and scale them down to give it thickness and a bevel.
删除封闭的面,然后挤出循环和缩小给它厚度和一个斜面。

 回复: 在Blender使用 Cycles创建一个静物写生场景Create And Render A Still Life Scene In Blender, Using Cycles
Step 20
Press Shift A and add a Plane to create a base on which the objects will be kept.
按Shift +A键添加一个平面,创建放置物体的平台。

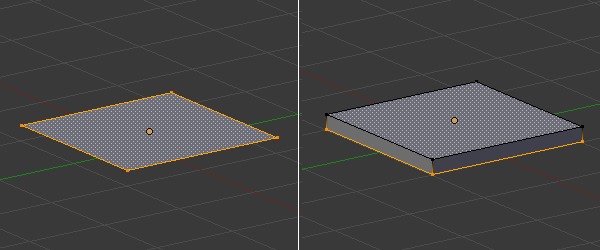
Select the plane and press TAB to enter into Edit mode. Select all vertices with the A key, and press E to extrude so that we can have some height.
选择平面物体,按TAB键进入编辑模式。按A键选择所有的顶点,然后按E键挤出它们让它们产生一定的高度。

Press Shift A and add a Plane to create a base on which the objects will be kept.
按Shift +A键添加一个平面,创建放置物体的平台。

Select the plane and press TAB to enter into Edit mode. Select all vertices with the A key, and press E to extrude so that we can have some height.
选择平面物体,按TAB键进入编辑模式。按A键选择所有的顶点,然后按E键挤出它们让它们产生一定的高度。

 回复: 在Blender使用 Cycles创建一个静物写生场景Create And Render A Still Life Scene In Blender, Using Cycles
Step 24
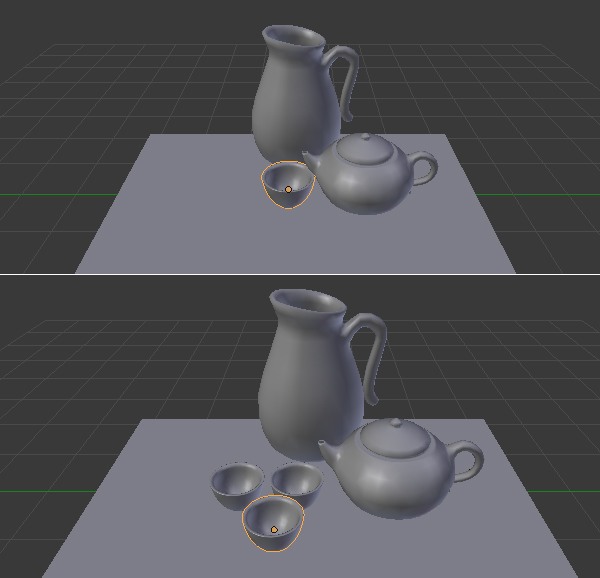
Press Shift+A and add a Camera. Place and rotate it so you can have a good close up view of the objects.
按Shift+A 添加一个相机。放置并旋转它以至于你可以有物体的一个很好的特写图。

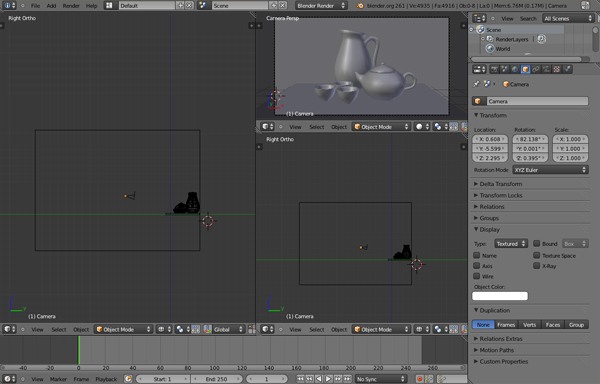
Split the 3D view into three. Move the mouse over to the corner and drag when the cursor changes.
拆分3D视图为三个。将鼠标移动到角落,当光标变化时拖动它。

In any of the 3d views Press 0 on the numpad to enter the camera view.
在任何3D视图按数字键0切换到摄像机视图。

Press Shift+A and add a Camera. Place and rotate it so you can have a good close up view of the objects.
按Shift+A 添加一个相机。放置并旋转它以至于你可以有物体的一个很好的特写图。

Split the 3D view into three. Move the mouse over to the corner and drag when the cursor changes.
拆分3D视图为三个。将鼠标移动到角落,当光标变化时拖动它。

In any of the 3d views Press 0 on the numpad to enter the camera view.
在任何3D视图按数字键0切换到摄像机视图。

您在这个论坛的权限:
您不能在这个论坛回复主题


