在Blender创建一个低多边形的雪佛兰汽车 第一部分 Create a Low Poly Camaro in Blender: Part 1
 在Blender创建一个低多边形的雪佛兰汽车 第一部分 Create a Low Poly Camaro in Blender: Part 1

Learn how to create a great looking, extremely light weight Chevy Camaro model using Blender in this two part series. In the first part, Karan Shah will walk you through the process of creating the low poly model from reference images, before moving onto UVMapping and Texturing in part 2.
在这两部分的教程将学习如何使用Blender 创建非常漂亮,低多边形的雪佛兰汽车的教程。在第一部分Karan Shah将告诉你从指定参考图像到如何创建低多边形的过程,在之后的第二部分将学习展UV和纹理贴图。
由Admin于周二 十二月 23, 2014 9:26 pm进行了最后一次编辑,总共编辑了1次
 回复: 在Blender创建一个低多边形的雪佛兰汽车 第一部分 Create a Low Poly Camaro in Blender: Part 1
1. Setting up the Reference Images
设置参考图像
Step 1
第一步
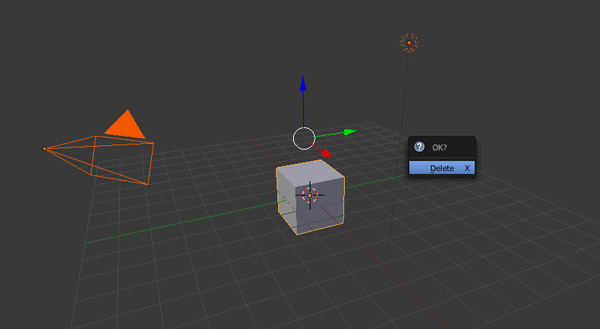
Search for 'Chevrolet Camaro Blueprint' in Google. Choose a set that has all four views of the car- top, front, side and back. I selected this image from cartype.com. Next, open Blender and in a new file, select all the objects by pressing the A key and then press Delete on the keyboard to delete them.
在谷歌搜索“雪佛兰Camaro蓝图”.选择一组有车顶视图,前视图,侧视图和后视图的图片。我选择的这张图片来自cartype.com。接下来是打开Blender,在新的文件按A键选择所有的物体并按键盘上的Delete或X键删除它们.

 回复: 在Blender创建一个低多边形的雪佛兰汽车 第一部分 Create a Low Poly Camaro in Blender: Part 1
Step 2
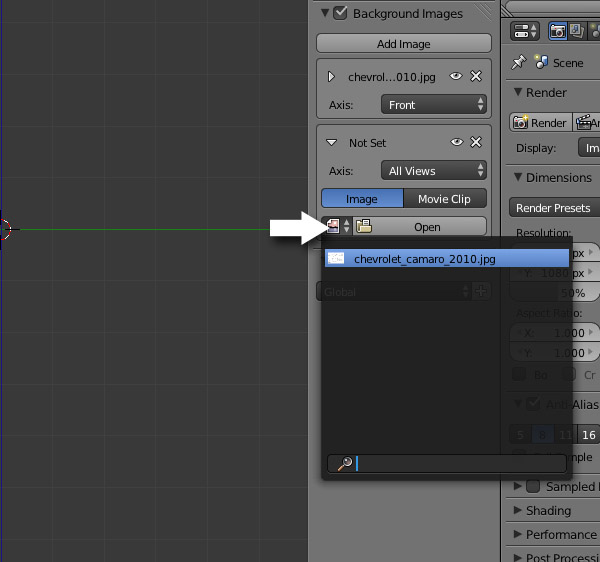
Press N to bring out the Properties panel. Scroll down to the Background Image panel and click on Add Image.
按N键呼出属性面板,向下滚动到背景图像(Image panel)面板如然后点击添加图像(Add Image)按钮。

Click Open to browse and select your image. The Background image is only viewable in ortho mode in the left, right, top, bottom, front and back views.
点击Open按钮打开资源管理器并选择你的图像。背景图像仅仅在正交模式的左(left),右(right),顶(top),底(bottom),前(front )和后(back)视图可见。

Press N to bring out the Properties panel. Scroll down to the Background Image panel and click on Add Image.
按N键呼出属性面板,向下滚动到背景图像(Image panel)面板如然后点击添加图像(Add Image)按钮。

Click Open to browse and select your image. The Background image is only viewable in ortho mode in the left, right, top, bottom, front and back views.
点击Open按钮打开资源管理器并选择你的图像。背景图像仅仅在正交模式的左(left),右(right),顶(top),底(bottom),前(front )和后(back)视图可见。

 回复: 在Blender创建一个低多边形的雪佛兰汽车 第一部分 Create a Low Poly Camaro in Blender: Part 1
Step 3
Though the image is set for all views (left, right, top, bottom, front and back), we might have to align and move the model every time to match the background image for each different view, again and again. So we must have different image settings for each view.
虽然图像是为所有视图设置的(左,右,顶,底,前和后视图),我们也许需要每次视图改变都要移动模型在每个视图不断对齐匹配背景图像。所以在每个视图设置不同的图像。
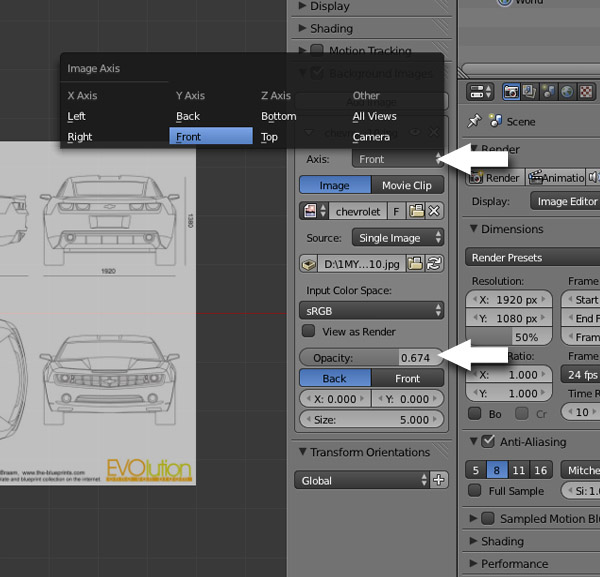
In the Background Images panel, choose Front in Axis. This means that this image will be viewable only in the front view, the shortcut to which is 1 on the Numpad. Adjust the Opacity slider to your preference.
在背景图像(Background Images)面板,在Axis选择前视图(Front)。这意味着这个图像仅仅在前视图可见,快捷键是数字键盘上的1键。调整不透明度滑块。

由Admin于周二 十二月 23, 2014 10:13 pm进行了最后一次编辑,总共编辑了3次
 回复: 在Blender创建一个低多边形的雪佛兰汽车 第一部分 Create a Low Poly Camaro in Blender: Part 1
Step 4
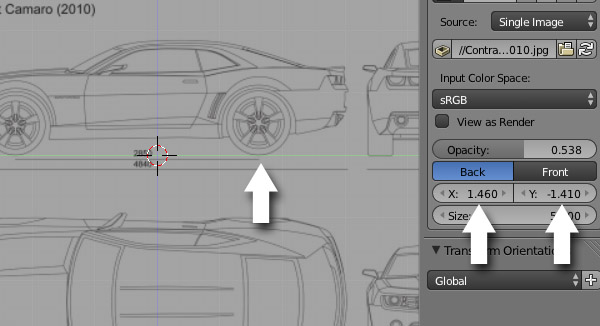
By default the image is displayed at the center of the viewport. But we need to adjust it in such a way that the front view of the car is in the center, as we need only the front part of the car for this view.
默认的图像显示在视图窗口的中心。但我们需要以这样一种方式调整它,汽车在前视图中心,在这个视图仅仅需要显示汽车的前面部分。
With the mouse in 3D view, press 1 on the numpad to get into the Front view. Make sure you are in ortho view mode - press 5 (numpad) to toggle between ortho mode and the perspective view. Adjust the X and Y sliders so that the front view of the car is in the middle of the blue line (X axis) and the bottom of the wheels are touching the red line (Y axis). You can press Shift while dragging the X and Y sliders for precision. The front view setup is now done.
鼠标在3D视图,按数字键1切换到前视图。确保你是在正交视图模式--数字键5是在正交和透视模式切换。调整X和Y轴心,以使汽车的正视图是在蓝线(X轴)的中间,并且底部的轮子相接触红线(Y轴) 。你可以按下Shift 调整X和Y轴可以更精确。前视图现在设置完成。

 回复: 在Blender创建一个低多边形的雪佛兰汽车 第一部分 Create a Low Poly Camaro in Blender: Part 1
由Admin于周三 十二月 24, 2014 9:54 pm进行了最后一次编辑,总共编辑了1次
 回复: 在Blender创建一个低多边形的雪佛兰汽车 第一部分 Create a Low Poly Camaro in Blender: Part 1
Step 7
Similarly, add another Background image for the Top view. Adjust the X and Y sliders so that the top view of the car in the image is in the center. In a photo editor, I have rotated my image 90 degrees so that the top view of the car in the image is vertical. This is not compulsory, but it will be easier to align and match the model to the reference image in the top view, otherwise we might need to move and rotate the model again and again to match the reference.
同样的,为顶视图添加另外的背景图像。调整X和Y轴,让车的顶部视图显示在顶视图的中心。在一个图像编辑软件,我旋转参考图90度,让卡车顶部视图是垂直。这个不一定必须这样做,但它会更容易对齐和匹配模型到参考图像。

由Admin于周三 十二月 24, 2014 10:24 pm进行了最后一次编辑,总共编辑了1次
 回复: 在Blender创建一个低多边形的雪佛兰汽车 第一部分 Create a Low Poly Camaro in Blender: Part 1
Step 8
Now add another Background image for the Back view. Press Shift-1 (numpad) to get into the Back view. Adjust the X and Y sliders so that the back view of the car in the image is in the center and the base of the wheels are just on top of the red line (X axis). Now we have set up all the background images for all ortho views. You can check them by pressing the numpad keys - 1 for Front, 3 for Right, 7 for Top and Shift+1 (Numpad) for Back. Press Control-S to save the file.
现在添加另外的图像给后视图。按Shift-1 (数字键)切换到后视图。调整X,Y轴让汽车后视图在视图中心和车轮刚刚在红线顶部|(X轴)。现在我们为所有的正交视图设置了背景图像。你可以按数字键检查它们-1是前视图,3是右视图,7是顶视图,Shift-1 后视图。按Control-S(WIN CTRL+S)保存文件。

 回复: 在Blender创建一个低多边形的雪佛兰汽车 第一部分 Create a Low Poly Camaro in Blender: Part 1
2. Modeling the Body
Step 1
Press 3 on the Numpad to get into the Right view. Before we start modeling, we need to know which lines to follow. The lines marked in blue are the actual sides of the car, whereas the line in red is not. The red line is the center of the car.
按数字键3切换到右视图。在我们开始建模前我们需要知道那些线表示什么。标记为蓝色的线是车的实际的边线,而红色的线不是,红线是车的中心。

Press 3 on the Numpad to get into the Right view. Press Shift-A and add a Plane.
按数字键3切换到右视图。按Shift-A添加一个平面。
Step 1
Press 3 on the Numpad to get into the Right view. Before we start modeling, we need to know which lines to follow. The lines marked in blue are the actual sides of the car, whereas the line in red is not. The red line is the center of the car.
按数字键3切换到右视图。在我们开始建模前我们需要知道那些线表示什么。标记为蓝色的线是车的实际的边线,而红色的线不是,红线是车的中心。

Press 3 on the Numpad to get into the Right view. Press Shift-A and add a Plane.
按数字键3切换到右视图。按Shift-A添加一个平面。
由Admin于周四 十二月 25, 2014 12:58 am进行了最后一次编辑,总共编辑了2次
 回复: 在Blender创建一个低多边形的雪佛兰汽车 第一部分 Create a Low Poly Camaro in Blender: Part 1
Step 2
By default the plane is aligned to the grid floor. Press TAB to enter into Edit mode. We need to rotate it 90 degree, so that it is aligned to the right view. With all the vertices selected, press R (to rotate), then N (to enter a numeric value) and then type 90 (for 90 degrees). Finally press Y (to rotate on the Y axis) and press Enter to confirm. You can press T and N to hide the Properties panel and Toolshelf.
默认的平面是对齐到栅格平面的,按TAB进入到编辑模式。我们想要旋转它90度,让它对齐到右视图。选择所有的顶点,按R旋转,然后按N(输入一个数值)然后输入90(90度)。最后按Y(以Y轴为中心旋转)最后按回车确认。你可以按T,或N键隐藏工具和属性面板。

 回复: 在Blender创建一个低多边形的雪佛兰汽车 第一部分 Create a Low Poly Camaro in Blender: Part 1
Step 3
Press B to drag select the two vertices of the side. Drag them to the side edge of the car, with the arrow widget. You can turn On/Off the widget from the window header.
按B键拖动选择边上的两个定点。使用箭头轴拖动它们到车的侧边。你可以在窗口标题栏打开\关闭箭头轴。


Similarly, drag the left two vertices to the edge of the car. Press B to drag select the vertices. Drag them to the side edge of the car with the arrow widget.
同样的,头东左边的两个顶点到车的边缘。按B键拖动选择的顶点。使用箭头轴拖动它们到车的侧边。

Press B to drag select the two vertices of the side. Drag them to the side edge of the car, with the arrow widget. You can turn On/Off the widget from the window header.
按B键拖动选择边上的两个定点。使用箭头轴拖动它们到车的侧边。你可以在窗口标题栏打开\关闭箭头轴。


Similarly, drag the left two vertices to the edge of the car. Press B to drag select the vertices. Drag them to the side edge of the car with the arrow widget.
同样的,头东左边的两个顶点到车的边缘。按B键拖动选择的顶点。使用箭头轴拖动它们到车的侧边。

 回复: 在Blender创建一个低多边形的雪佛兰汽车 第一部分 Create a Low Poly Camaro in Blender: Part 1
Step 4
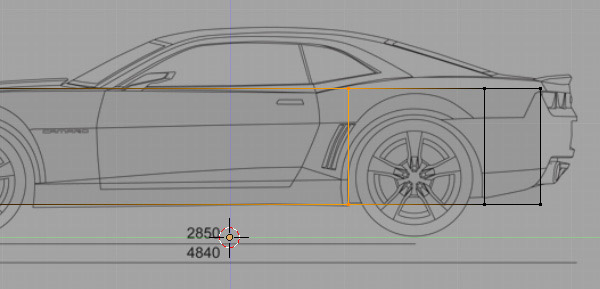
You can toggle between solid shading view and wireframe view with the Z key (so that we can see the reference image.) Drag select the bottom two vertices with the B key and then move them using the arrow widget to align them with the bottom line of the car.
你可以使用Z键在solid(实体)模式和线框(wireframe)模式切换(这样你可以看到参考图像)。使用B键盘拖动底部的两个顶点使用箭头轴移动对齐它们到车的底部

Again, drag the top two vertices to align them with the bottom border of the windows, as shown in the image.
再次拖动顶部的连个定点对齐到车的窗口边界,如下图

You can toggle between solid shading view and wireframe view with the Z key (so that we can see the reference image.) Drag select the bottom two vertices with the B key and then move them using the arrow widget to align them with the bottom line of the car.
你可以使用Z键在solid(实体)模式和线框(wireframe)模式切换(这样你可以看到参考图像)。使用B键盘拖动底部的两个顶点使用箭头轴移动对齐它们到车的底部

Again, drag the top two vertices to align them with the bottom border of the windows, as shown in the image.
再次拖动顶部的连个定点对齐到车的窗口边界,如下图

 回复: 在Blender创建一个低多边形的雪佛兰汽车 第一部分 Create a Low Poly Camaro in Blender: Part 1
Step 8
Add another edge loop, this time horizontal across the body, just above the tip of the wheel cut. Place your mouse over the mesh and press Control-R. Move the mouse near the sides to bring up the horizontal loop cut option, Left Click to confirm. Move the mouse up to place the loop on the top edge of the wheel cut, and Left Click again to confirm the position.
添加另外的循环切割,这次是水平切割,刚好在车轮的上方。确保你的鼠标在网格体上并按下CTRL+R键。两侧附近移动鼠标,调出水平环切选项,左键点击确认。向上移动鼠标到车轮的顶部边界,再次点击鼠标确认。

由Admin于周日 三月 15, 2015 11:16 am进行了最后一次编辑,总共编辑了1次
 回复: 在Blender创建一个低多边形的雪佛兰汽车 第一部分 Create a Low Poly Camaro in Blender: Part 1
Step 12
Right Click on the top corner vertex to select it. Press G on the keyboard and move the point downwards to match the reference line. Left Click to confirm the position.
右键点击选择顶部角落的顶点,G键盘移动顶点匹配参考线。点击鼠标左键确认。
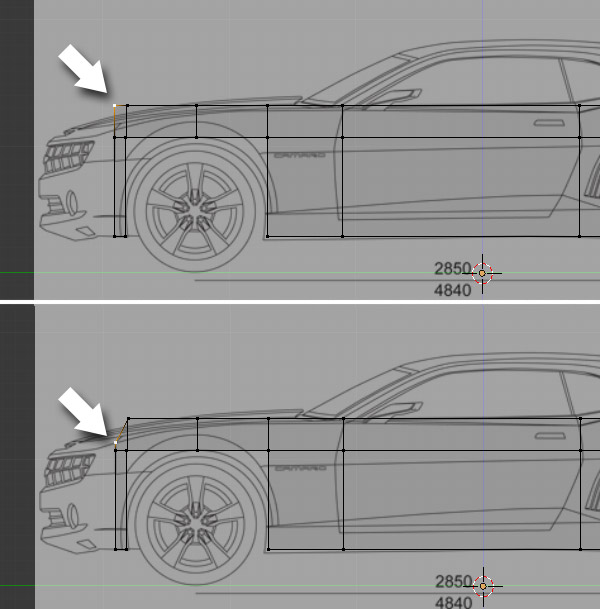
Move and match all the points one by one, with the side line of the car in the reference image.
移动其它的顶点匹配到图像小车的参考线。

Right Click on the top corner vertex to select it. Press G on the keyboard and move the point downwards to match the reference line. Left Click to confirm the position.
右键点击选择顶部角落的顶点,G键盘移动顶点匹配参考线。点击鼠标左键确认。

Move and match all the points one by one, with the side line of the car in the reference image.
移动其它的顶点匹配到图像小车的参考线。

 回复: 在Blender创建一个低多边形的雪佛兰汽车 第一部分 Create a Low Poly Camaro in Blender: Part 1
Step 14
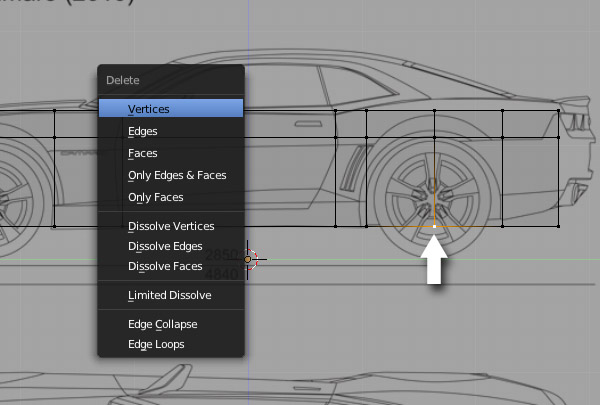
Add a new edge loop as shown in the image below. Move your mouse over the mesh and press Control-R to add an edge loop. Left Click to confirm and then place it around the bottom. Left Click again to confirm. Move and tweak the outer vertices to give it a nice round shape.
添加一个新的边循环,如下图所示。将鼠标移到网格并按下Ctrl -R增加边缘循环。左键点击确认,然后将它放置到周围的底部。点击左键再次确认。移动和调整外顶点给它一个很好的圆形。

您在这个论坛的权限:
您不能在这个论坛回复主题

