Blender:卡通渲染渲染引擎 Blender: Freestyle render engine
![]()
 Blender:卡通渲染渲染引擎 Blender: Freestyle render engine
![]() 由 Admin 周日 三月 29, 2015 5:26 pm
由 Admin 周日 三月 29, 2015 5:26 pm
Blender: Freestyle render engine
By Filippo Veniero

If you're looking for a good, open source renderer, look no further than Freestyle for Blender. Looking for a photoreal finish or a cartoon? Freestyle can do both.
如果你正在寻找一个良好的,开放源码的渲染器,没有比Blender的卡通渲染更好好的。寻找一个真实感或卡通?卡通渲染可以一举两得。
Introduction 介绍
Every day, 3D artists spend hours working on their computers trying to get photorealistic images, but sometimes we need to have images styled more like a comic; luckily Blender can do them, using the Freestyle option! Freestyle is an edge and line based non-photorealistic render engine. It generates 2D line drawing from a set of objects; lines can be stylized in a lot of ways (different line colors and thickness or by adding random displacements) to produce artistic (hand drawn) or technical (blueprint) styles. Freestyle for Blender has two complementary modes for line stylization: the Parameter Editor and the Python Scripting mode. In this tutorial we'll use the first one.
每天, 3D艺术家花几个小时的工作在他们的计算机试图让图像更逼真的,但有时我们需要有风格更像漫画图像;幸运的是,Blender 可以使用Freestyle(卡通渲染)做到!Freestyle(卡通渲染)是一个基于边缘线的非真实感渲染引擎。它从一组物体生成2D绘画线;这些线可以被许多的方法(如通过添加随机位移添加不同线的颜色和厚度)来生成艺术(手绘)或技术(设计图)风格。Freestyle(卡通渲染)有两种补充的方法定义线的格式:参数编辑和Python脚本方式。在本教程中,我们将使用第一个方法。
By Filippo Veniero
If you're looking for a good, open source renderer, look no further than Freestyle for Blender. Looking for a photoreal finish or a cartoon? Freestyle can do both.
如果你正在寻找一个良好的,开放源码的渲染器,没有比Blender的卡通渲染更好好的。寻找一个真实感或卡通?卡通渲染可以一举两得。
Introduction 介绍
Every day, 3D artists spend hours working on their computers trying to get photorealistic images, but sometimes we need to have images styled more like a comic; luckily Blender can do them, using the Freestyle option! Freestyle is an edge and line based non-photorealistic render engine. It generates 2D line drawing from a set of objects; lines can be stylized in a lot of ways (different line colors and thickness or by adding random displacements) to produce artistic (hand drawn) or technical (blueprint) styles. Freestyle for Blender has two complementary modes for line stylization: the Parameter Editor and the Python Scripting mode. In this tutorial we'll use the first one.
每天, 3D艺术家花几个小时的工作在他们的计算机试图让图像更逼真的,但有时我们需要有风格更像漫画图像;幸运的是,Blender 可以使用Freestyle(卡通渲染)做到!Freestyle(卡通渲染)是一个基于边缘线的非真实感渲染引擎。它从一组物体生成2D绘画线;这些线可以被许多的方法(如通过添加随机位移添加不同线的颜色和厚度)来生成艺术(手绘)或技术(设计图)风格。Freestyle(卡通渲染)有两种补充的方法定义线的格式:参数编辑和Python脚本方式。在本教程中,我们将使用第一个方法。
Admin- Admin
- 帖子数 : 324
注册日期 : 14-07-10 -

![]()
![]()
回复: Blender:卡通渲染渲染引擎 Blender: Freestyle render engine
![]() 由 Admin 周日 三月 29, 2015 5:55 pm
由 Admin 周日 三月 29, 2015 5:55 pm
Step 1: Model setup
For this tutorial we will use a Vespa Special model (the file is here).
这个指南将用到的Vespa Special 模型(文件可以在这里下载)
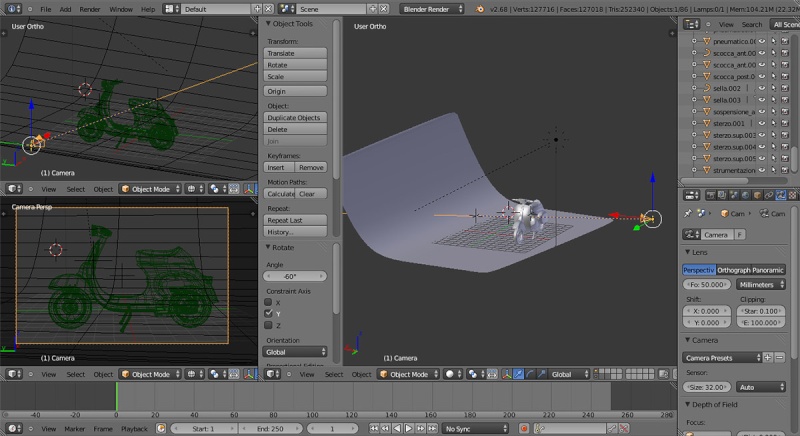
Open Blender and load the .blend file. Change the render engine from Cycles Render to Blender Render, then select emission planes on the top of the scene and delete them. Add a Sun Lamp (Shift+A > Lamp > Sun) and rotate it about 60 degrees along the y axis and 45 along the z axis. Select the camera and turn off depth of field in the camera options tab.
打开Blender,载入.blend 文件。改变渲染引擎为Cycles,然后选择在场景的顶部选择反光板并删除它。添加一个Sun灯(Shift+A > Lamp > Sun)沿着Y轴旋转大约60度,沿着Z轴旋转45度。选择相机在相机选项卡打开depth of field (景深)。
Model setup
For this tutorial we will use a Vespa Special model (the file is here).
这个指南将用到的Vespa Special 模型(文件可以在这里下载)
Open Blender and load the .blend file. Change the render engine from Cycles Render to Blender Render, then select emission planes on the top of the scene and delete them. Add a Sun Lamp (Shift+A > Lamp > Sun) and rotate it about 60 degrees along the y axis and 45 along the z axis. Select the camera and turn off depth of field in the camera options tab.
打开Blender,载入.blend 文件。改变渲染引擎为Cycles,然后选择在场景的顶部选择反光板并删除它。添加一个Sun灯(Shift+A > Lamp > Sun)沿着Y轴旋转大约60度,沿着Z轴旋转45度。选择相机在相机选项卡打开depth of field (景深)。
Model setup
Admin- Admin
- 帖子数 : 324
注册日期 : 14-07-10 -
![]()
![]()
回复: Blender:卡通渲染渲染引擎 Blender: Freestyle render engine
![]() 由 Admin 周日 三月 29, 2015 6:26 pm
由 Admin 周日 三月 29, 2015 6:26 pm
Step 2: Materials setup 材质设置
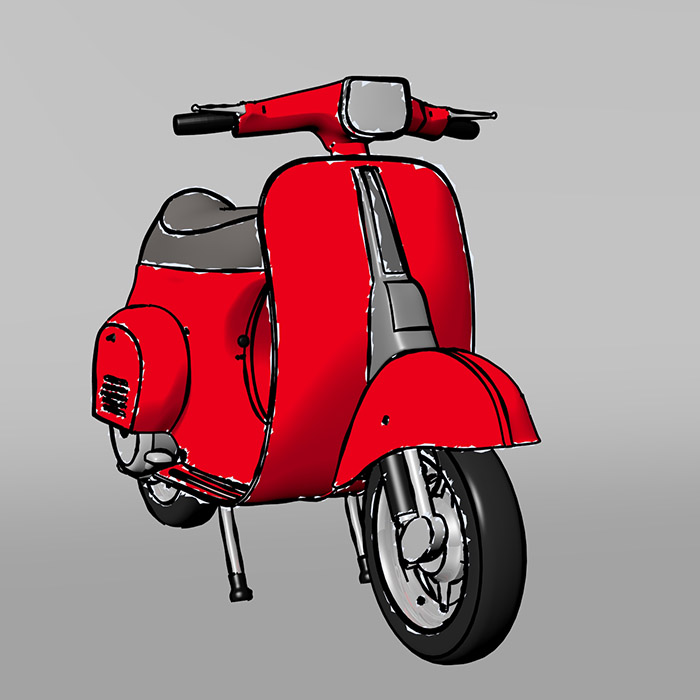
Now we'll change all the materials (created with nodes) from photorealist Cycles materials to Blender internal Toon shader. Select the body of the Vespa, go into the material tab and uncheck Use Shader Nodes. Select Toon shader, set smooth as 0,9, enable ramp (change white color to red) and set specular intensity to 0. Change all the others materials to Toon shader, (smooth = 0,8–0,9 and specular intensity = 0) and make a render test (see image). Now we're ready to play with freestyle.
现在我们改变所有的材质(创建和节点)从 Cycles photorealist材质到Blender内部的Toon 着色器。选择Vespa身体部分,到材质选项卡并不勾选Use Shader Nodes.选择 Toon shader, 设置smooth为0.9.激活ramp(渐变)(改变白颜色为红色)设置 specular intensity 为0.改变所有的其它材质为Toon shader, (smooth = 0,8–0,9 ,specular intensity = 0)做一个渲染测试(见图片) 。现在我们准备使用freestyle(卡通渲染)。

Render test of toon material
Now we'll change all the materials (created with nodes) from photorealist Cycles materials to Blender internal Toon shader. Select the body of the Vespa, go into the material tab and uncheck Use Shader Nodes. Select Toon shader, set smooth as 0,9, enable ramp (change white color to red) and set specular intensity to 0. Change all the others materials to Toon shader, (smooth = 0,8–0,9 and specular intensity = 0) and make a render test (see image). Now we're ready to play with freestyle.
现在我们改变所有的材质(创建和节点)从 Cycles photorealist材质到Blender内部的Toon 着色器。选择Vespa身体部分,到材质选项卡并不勾选Use Shader Nodes.选择 Toon shader, 设置smooth为0.9.激活ramp(渐变)(改变白颜色为红色)设置 specular intensity 为0.改变所有的其它材质为Toon shader, (smooth = 0,8–0,9 ,specular intensity = 0)做一个渲染测试(见图片) 。现在我们准备使用freestyle(卡通渲染)。
Render test of toon material
Admin- Admin
- 帖子数 : 324
注册日期 : 14-07-10 -
![]()
![]()
回复: Blender:卡通渲染渲染引擎 Blender: Freestyle render engine
![]() 由 Admin 周日 三月 29, 2015 6:35 pm
由 Admin 周日 三月 29, 2015 6:35 pm
Step 3: Freestyle line set options卡通线设置
Enable Freestyle in the render tab and select relative line thickness. Open the Layer tab and let's see the main options: you can control the amount of crease lines; culling enables you to mesh out of 3D view (improve performance); face smoothness makes smoother silhouette lines of objects (more render time).
在选项选项卡激活Freestyle并选择相对线宽。打开Layer选项卡,让我们看看主要的选项:你可以控制褶痕线的数量;激活culling你的网格出现在3D视图(提高性能); face光滑使物体上的线更顺畅(更多的渲染时间) 。
For Visibility there are three choices: Visible (only visible lines are rendered); Hidden (lines occluded by at least one su***ce are rendered) and QI Range (Quantitative Invisibility); lines occluded by a number of su***ces in the given range (start/end) are rendered.
对于Visibility有三个选择:Visible(仅仅在渲染可见线);Hidden(线在渲染被最少一个表面遮挡)和QI Range(定量隐形);线被在渲染给出的范围(开始/结束)被一些表面遮挡。
In the Edge type tab we have to choose one or more edge to render: Silhouette draws silhouettes around objects ¬– very good for organic models (it works only with a close mesh). Border is for open edge meshes (Suzanne's eye socket is an open edge). Contour draws the outer edges and inner open border. External Contour draws only on the outer contour edges. Material Boundary draws a line where 2 materials meet on the same object. Crease draws only edges whose adjacent faces form an angle greater than crease angle. Edge Marks renders marked edges (jump into edit mode, select the edges you want to be marked then Ctrl+E > mark freestyle edge).
在边类型型标签,我们必须选择一个或多个边缘来渲染:物体周围的轮廓绘制--对于有机模型是非常好的(它仅仅工作在选择的网格)。边界(Border)是开放边的网格(苏珊的眼圈是一个开放的边缘) 。Contour draws 是外边和内边界。External Contour draws仅仅是外轮廓边缘。Material Boundary draws是一条线在统一个物体的两种材质。Crease draws only仅仅是边缘的相邻面形成的角度大于折痕的角度。Edge Marks renders 标记边缘( into edit mode, 选择你想要标记的边然后按Ctrl+E > mark freestyle edge)。


Freestyle lines setting
Enable Freestyle in the render tab and select relative line thickness. Open the Layer tab and let's see the main options: you can control the amount of crease lines; culling enables you to mesh out of 3D view (improve performance); face smoothness makes smoother silhouette lines of objects (more render time).
在选项选项卡激活Freestyle并选择相对线宽。打开Layer选项卡,让我们看看主要的选项:你可以控制褶痕线的数量;激活culling你的网格出现在3D视图(提高性能); face光滑使物体上的线更顺畅(更多的渲染时间) 。
For Visibility there are three choices: Visible (only visible lines are rendered); Hidden (lines occluded by at least one su***ce are rendered) and QI Range (Quantitative Invisibility); lines occluded by a number of su***ces in the given range (start/end) are rendered.
对于Visibility有三个选择:Visible(仅仅在渲染可见线);Hidden(线在渲染被最少一个表面遮挡)和QI Range(定量隐形);线被在渲染给出的范围(开始/结束)被一些表面遮挡。
In the Edge type tab we have to choose one or more edge to render: Silhouette draws silhouettes around objects ¬– very good for organic models (it works only with a close mesh). Border is for open edge meshes (Suzanne's eye socket is an open edge). Contour draws the outer edges and inner open border. External Contour draws only on the outer contour edges. Material Boundary draws a line where 2 materials meet on the same object. Crease draws only edges whose adjacent faces form an angle greater than crease angle. Edge Marks renders marked edges (jump into edit mode, select the edges you want to be marked then Ctrl+E > mark freestyle edge).
在边类型型标签,我们必须选择一个或多个边缘来渲染:物体周围的轮廓绘制--对于有机模型是非常好的(它仅仅工作在选择的网格)。边界(Border)是开放边的网格(苏珊的眼圈是一个开放的边缘) 。Contour draws 是外边和内边界。External Contour draws仅仅是外轮廓边缘。Material Boundary draws是一条线在统一个物体的两种材质。Crease draws only仅仅是边缘的相邻面形成的角度大于折痕的角度。Edge Marks renders 标记边缘( into edit mode, 选择你想要标记的边然后按Ctrl+E > mark freestyle edge)。
Freestyle lines setting
Admin- Admin
- 帖子数 : 324
注册日期 : 14-07-10 -
![]()
![]()
回复: Blender:卡通渲染渲染引擎 Blender: Freestyle render engine
![]() 由 Admin 周日 三月 29, 2015 7:18 pm
由 Admin 周日 三月 29, 2015 7:18 pm
Step 4: Freestyle line style options 卡通线样式选项
Line style settings define the appearance of lines; we have 5 main menu choices: stroke, color, alpha, thickness and geometry.
线样式设置定义线条的外观;我们有5个主菜单选项:stroke, color, alpha, thickness 和 geometry.
In the Geometry tab control, there are thirteen modifiers available that add some 2-dimensional offsets, displacement or noise at lines (geometry image). The Thickness tab has five modifiers available, we can simulate broad and flat pens for calligraphy or change line thickness using the distance to the active camera or mesh material (thickness image). Alpha and Color tabs control the transparency and color of the strokes (alpha-color image). In the Stroke tab we can tweaks lines: remove the ones longer/shorter than the threshold; change types of line caps or enable dashed lines (stroke image).
在几何标签控件,它们有13个可用的修改添加一些二维的偏移,位移和线的噪点(geometry图像)。在Thickness标签有5个可用的修改,我们可以模拟broad和 flat的钢笔笔迹,可以使用distance 来为激活的相机或网格材质(thickness 图像)改变线的厚度。Alpha 和 Color标签控制transparency (透明度)和笔迹颜色(alpha-color 图像)。在Stroke(笔迹)标签我们可以调整线:删除那些过短或过长的入口线;改变线类型或启用虚线(stroke 图像).

Geometry

Thickness

Alpha color

Stroke
Line style settings define the appearance of lines; we have 5 main menu choices: stroke, color, alpha, thickness and geometry.
线样式设置定义线条的外观;我们有5个主菜单选项:stroke, color, alpha, thickness 和 geometry.
In the Geometry tab control, there are thirteen modifiers available that add some 2-dimensional offsets, displacement or noise at lines (geometry image). The Thickness tab has five modifiers available, we can simulate broad and flat pens for calligraphy or change line thickness using the distance to the active camera or mesh material (thickness image). Alpha and Color tabs control the transparency and color of the strokes (alpha-color image). In the Stroke tab we can tweaks lines: remove the ones longer/shorter than the threshold; change types of line caps or enable dashed lines (stroke image).
在几何标签控件,它们有13个可用的修改添加一些二维的偏移,位移和线的噪点(geometry图像)。在Thickness标签有5个可用的修改,我们可以模拟broad和 flat的钢笔笔迹,可以使用distance 来为激活的相机或网格材质(thickness 图像)改变线的厚度。Alpha 和 Color标签控制transparency (透明度)和笔迹颜色(alpha-color 图像)。在Stroke(笔迹)标签我们可以调整线:删除那些过短或过长的入口线;改变线类型或启用虚线(stroke 图像).
Geometry
Thickness
Alpha color
Stroke
Admin- Admin
- 帖子数 : 324
注册日期 : 14-07-10 -
![]()
![]()
回复: Blender:卡通渲染渲染引擎 Blender: Freestyle render engine
![]() 由 Admin 周日 三月 29, 2015 7:59 pm
由 Admin 周日 三月 29, 2015 7:59 pm
Step 5: Render setup 渲染设置
For our render, we'll use 2 sets of lines; the first one will be a black line with a calligraphy (orientation 60 degree, min thickness=1, max thickness=2) along with the stroke modifier (curve mapped, min value=1, max value=4). The second set of lines will be white with a calligraphy modifier (60 degree, min thickness=1, max thickness=3) and a spatial noise (amplitude 2, scale 20) and perlin noise (frequency 30 and amplitude 15). Set camera and hit F12 to render.
对于我们的渲染,我们使用两种线;第一种是黑线(orientation 60度,min thickness=1, max thickness=2)和stroke modifier(curve mapped, min value=1, max value=4)一起. 第二种白色笔迹calligraphy modifier(60度,min thickness=1, max thickness=3)和spatial noise (amplitude 2, scale 20)和 perlin noise (frequency 30 和amplitude 15). 设置相机并按F12渲染。

Render setup
Top tip 1: Postproduction with Gimp 使用 Gimp 后期制作
I usually use material index before I start the render; in this way, when I work in Gimp, I can easily select the different materials of my models and the post-production workflow becomes quicker and more efficient.
在我开始渲染前我常常使用材质索引;用这种方法当我们工作在Gimp, 我能够容易选择不同的材质为我的模型和后期工作流程制作变得更快更高效。

Material index pass
For our render, we'll use 2 sets of lines; the first one will be a black line with a calligraphy (orientation 60 degree, min thickness=1, max thickness=2) along with the stroke modifier (curve mapped, min value=1, max value=4). The second set of lines will be white with a calligraphy modifier (60 degree, min thickness=1, max thickness=3) and a spatial noise (amplitude 2, scale 20) and perlin noise (frequency 30 and amplitude 15). Set camera and hit F12 to render.
对于我们的渲染,我们使用两种线;第一种是黑线(orientation 60度,min thickness=1, max thickness=2)和stroke modifier(curve mapped, min value=1, max value=4)一起. 第二种白色笔迹calligraphy modifier(60度,min thickness=1, max thickness=3)和spatial noise (amplitude 2, scale 20)和 perlin noise (frequency 30 和amplitude 15). 设置相机并按F12渲染。
Render setup
Top tip 1: Postproduction with Gimp 使用 Gimp 后期制作
I usually use material index before I start the render; in this way, when I work in Gimp, I can easily select the different materials of my models and the post-production workflow becomes quicker and more efficient.
在我开始渲染前我常常使用材质索引;用这种方法当我们工作在Gimp, 我能够容易选择不同的材质为我的模型和后期工作流程制作变得更快更高效。
Material index pass
Admin- Admin
- 帖子数 : 324
注册日期 : 14-07-10 -
![]()
![]()
![]()
您在这个论坛的权限:
您不能在这个论坛回复主题