创建“质子队长”Making Of 'Captain Proton'
![]()
 创建“质子队长”Making Of 'Captain Proton'
![]() 由 Admin 周五 三月 27, 2015 10:06 pm
由 Admin 周五 三月 27, 2015 10:06 pm
创建“质子队长”Making Of 'Captain Proton'
By Luis Arizaga

This cartoon character was based on a retro sci-fi idea. I wanted to show a character with strong pose, expression and silhouette with 3D art. My goal was to complete the process in 3D with the open source software Blender. In Blender you can configure your shortcut keys and the inte***ce layout to match any stage of the process. What I did first was to prepare my tools for the task I needed and save the layout with a name.
这个卡通人物是基于复古的科技想法。我想要显示一个强大的 姿势,使用3D艺术来表达。我的目标是使用开源的Blender软件来完成这个过程。在Blender 你可以自定义你的快捷键和不同的过程对应不同的界面布局。我首先是准备我的任务需要的工具,然后保存布局。
(The 3D character creation method doesn't depend on the software. So you will be able to reproduce the same with your favorite tool).
(三维角色创建方法不依赖于软件。所以,你就可以用你喜欢的工具来创建相同的角色) 。
By Luis Arizaga
This cartoon character was based on a retro sci-fi idea. I wanted to show a character with strong pose, expression and silhouette with 3D art. My goal was to complete the process in 3D with the open source software Blender. In Blender you can configure your shortcut keys and the inte***ce layout to match any stage of the process. What I did first was to prepare my tools for the task I needed and save the layout with a name.
这个卡通人物是基于复古的科技想法。我想要显示一个强大的 姿势,使用3D艺术来表达。我的目标是使用开源的Blender软件来完成这个过程。在Blender 你可以自定义你的快捷键和不同的过程对应不同的界面布局。我首先是准备我的任务需要的工具,然后保存布局。
(The 3D character creation method doesn't depend on the software. So you will be able to reproduce the same with your favorite tool).
(三维角色创建方法不依赖于软件。所以,你就可以用你喜欢的工具来创建相同的角色) 。
Admin- Admin
- 帖子数 : 324
注册日期 : 14-07-10 -

![]()
![]()
回复: 创建“质子队长”Making Of 'Captain Proton'
![]() 由 Admin 周五 三月 27, 2015 10:57 pm
由 Admin 周五 三月 27, 2015 10:57 pm
References and Concept References and Concept
You will not achieve an appealing 3D character if you don't have good references with good bases in character design. Working in 3D takes a long time and you will forget elements that are key points during the process. It's very important to define your 2D concept art design. In this case I collected a bunch of references from the internet and also had a female alien concept that I liked (Fig.01a). Sometimes I'll do a quick 3D sculpt concept too, like the one shown in Fig.01b.
如果你没有基于角色设计的很好的参考,你太可能创建出一个有吸引力的3D人物。3D工作需要很长的时间,你会忘记在此过程中的关键要素。这是非常重要的定义你的2D概念艺术设计。因为这个情况,我从互联网上收集了一堆参考图,也有一个女外星人的概念我非常喜欢( Fig.01a ) 。有时候,我会做一个快速的3D造型的概念,像在Fig.01b所示。
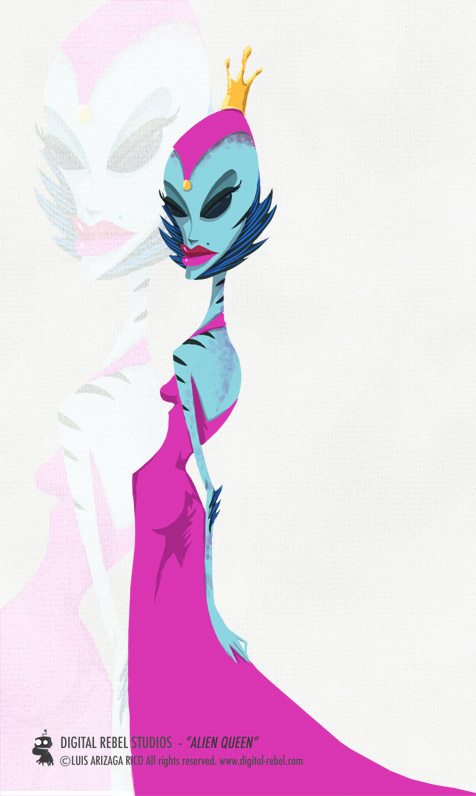
Fig. 01a
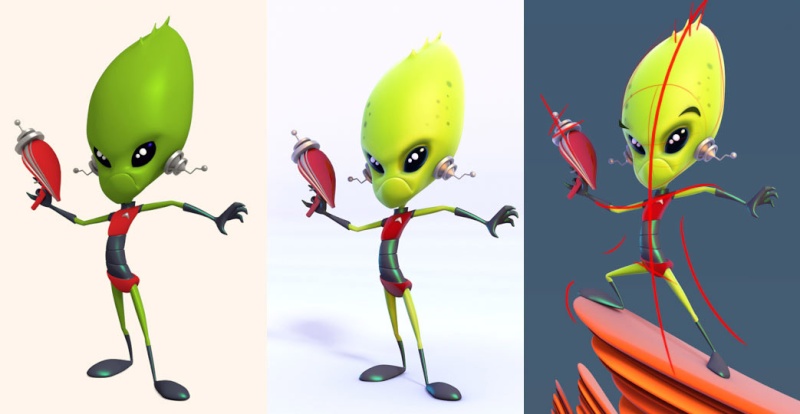
Fig. 01b
Tip: Come up with a good 2D character design before you start modeling. Sketches are always faster and easier to change than digital sculptures. It will be a lot less painful.
提示:在你开始建模之前,有一个很好的2D人物的设计是不错的主意。草图总是更快,更容易改变比起数字雕塑。这将是少了很多痛苦。
You will not achieve an appealing 3D character if you don't have good references with good bases in character design. Working in 3D takes a long time and you will forget elements that are key points during the process. It's very important to define your 2D concept art design. In this case I collected a bunch of references from the internet and also had a female alien concept that I liked (Fig.01a). Sometimes I'll do a quick 3D sculpt concept too, like the one shown in Fig.01b.
如果你没有基于角色设计的很好的参考,你太可能创建出一个有吸引力的3D人物。3D工作需要很长的时间,你会忘记在此过程中的关键要素。这是非常重要的定义你的2D概念艺术设计。因为这个情况,我从互联网上收集了一堆参考图,也有一个女外星人的概念我非常喜欢( Fig.01a ) 。有时候,我会做一个快速的3D造型的概念,像在Fig.01b所示。
Fig. 01a
Fig. 01b
Tip: Come up with a good 2D character design before you start modeling. Sketches are always faster and easier to change than digital sculptures. It will be a lot less painful.
提示:在你开始建模之前,有一个很好的2D人物的设计是不错的主意。草图总是更快,更容易改变比起数字雕塑。这将是少了很多痛苦。
Admin- Admin
- 帖子数 : 324
注册日期 : 14-07-10 -
![]()
![]()
回复: 创建“质子队长”Making Of 'Captain Proton'
![]() 由 Admin 周五 三月 27, 2015 11:31 pm
由 Admin 周五 三月 27, 2015 11:31 pm
Modeling 建模
I started by modeling the volume of the character. As I often do, I started with the head, and used simple polygon objects like a box. Then I divided the box with vertical and horizontal edges. In Blender I used the option To Sphere with the box (Spherify in 3ds Max), erased one side of my box and added a mirror modifier (Symmetry in 3ds Max) (Fig.02).
我开始创建角色常常使用体积建模。正如我经常这样做,我开始用简单的多边形物体像一个盒子物体创建头部,然后分割水平和垂直的边。在Blender 我使用球体化(To Sphere )选项球体化盒子物体(在3D是Spherify球形扭曲 ),我删除盒子的一边并添加一个镜像修改器(在3D是对称Symmetry)(Fig.02).
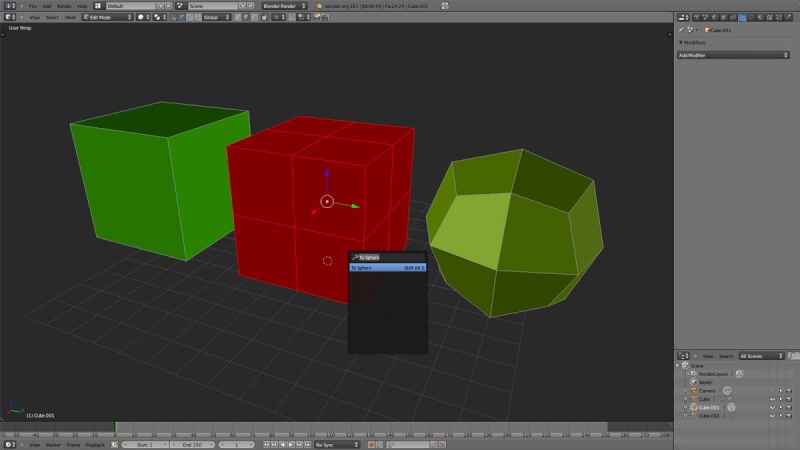
Fig. 02
Tip: To sphere a mesh, select the elements (vertex, edges or faces) you want to affect in Edit mode, press Shift + Alt + S and drag your mouse out.
要球体化(To Sphere )一个网格,在编辑模式下选择你想要影响的元素(vertex, edges or faces) ,按Shift + Alt + S和拖动鼠标。
At this point, I didn't pay attention to details and just tried to define the main shape well. I continued with the geometry, adding more edge loops and pushing the vertexes and edges until I was happy with the entire body shape and the proportions. Having contrasting shapes is very important when it comes to character designer. I kept this in mind and also looked for good topology (Fig.03 - 04).
在这一点上,我没有注意细节,只是试图定义好主形状。我继续工作在几何体,增加更多的边循环,移动顶点和边直到我对整个身体的形状和比例很满意。当谈到角色设计师有鲜明对比的形状是非常重要的。我一直在考虑到这一点,也追求更好的好拓扑结构(如图3 - 04 ) 。
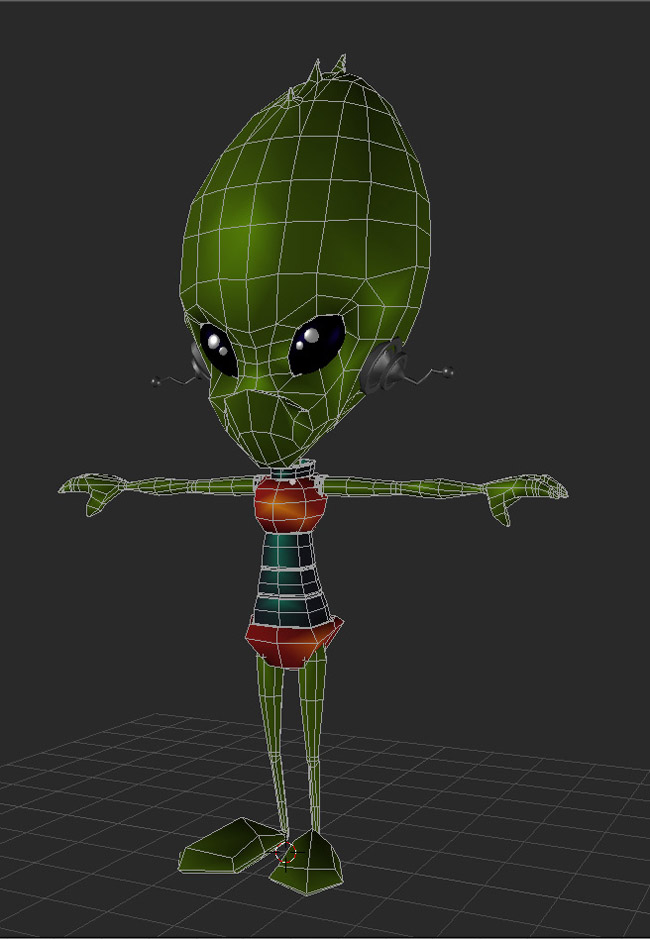
Fig. 03
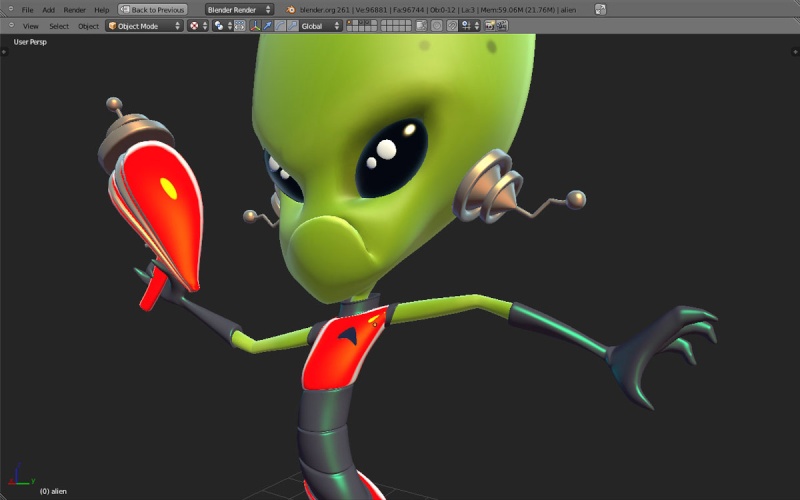
Fig. 04
Tip: The topology that can be used for animation can also be used to pose your character in a easier way.
提示:好的拓扑对于调动画和摆动作是更容易的。
I started by modeling the volume of the character. As I often do, I started with the head, and used simple polygon objects like a box. Then I divided the box with vertical and horizontal edges. In Blender I used the option To Sphere with the box (Spherify in 3ds Max), erased one side of my box and added a mirror modifier (Symmetry in 3ds Max) (Fig.02).
我开始创建角色常常使用体积建模。正如我经常这样做,我开始用简单的多边形物体像一个盒子物体创建头部,然后分割水平和垂直的边。在Blender 我使用球体化(To Sphere )选项球体化盒子物体(在3D是Spherify球形扭曲 ),我删除盒子的一边并添加一个镜像修改器(在3D是对称Symmetry)(Fig.02).
Fig. 02
Tip: To sphere a mesh, select the elements (vertex, edges or faces) you want to affect in Edit mode, press Shift + Alt + S and drag your mouse out.
要球体化(To Sphere )一个网格,在编辑模式下选择你想要影响的元素(vertex, edges or faces) ,按Shift + Alt + S和拖动鼠标。
At this point, I didn't pay attention to details and just tried to define the main shape well. I continued with the geometry, adding more edge loops and pushing the vertexes and edges until I was happy with the entire body shape and the proportions. Having contrasting shapes is very important when it comes to character designer. I kept this in mind and also looked for good topology (Fig.03 - 04).
在这一点上,我没有注意细节,只是试图定义好主形状。我继续工作在几何体,增加更多的边循环,移动顶点和边直到我对整个身体的形状和比例很满意。当谈到角色设计师有鲜明对比的形状是非常重要的。我一直在考虑到这一点,也追求更好的好拓扑结构(如图3 - 04 ) 。
Fig. 03
Fig. 04
Tip: The topology that can be used for animation can also be used to pose your character in a easier way.
提示:好的拓扑对于调动画和摆动作是更容易的。
Admin- Admin
- 帖子数 : 324
注册日期 : 14-07-10 -
![]()
![]()
回复: 创建“质子队长”Making Of 'Captain Proton'
![]() 由 Admin 周五 三月 27, 2015 11:40 pm
由 Admin 周五 三月 27, 2015 11:40 pm
I continued with the face details. I added edges or extruded polygons to define the key areas: mouth, eyes, nose and ears. I added a subdivision su***ce modifier to test these elements in high resolution. I used the Sculpt tool with the Multi Resolution modifier when I was happy with the polygon's base mesh (Fig.05).
我继续工作在面部的细节。我添加边并挤出多边形来定义主要的部位:嘴,眼睛,鼻子和耳朵。我添加了一个细分表面(subdivision su***ce )修改器,测试在高模时角色效果。我使用雕刻工具和Multi Resolution 修改器直到我对这个基础模型满意。
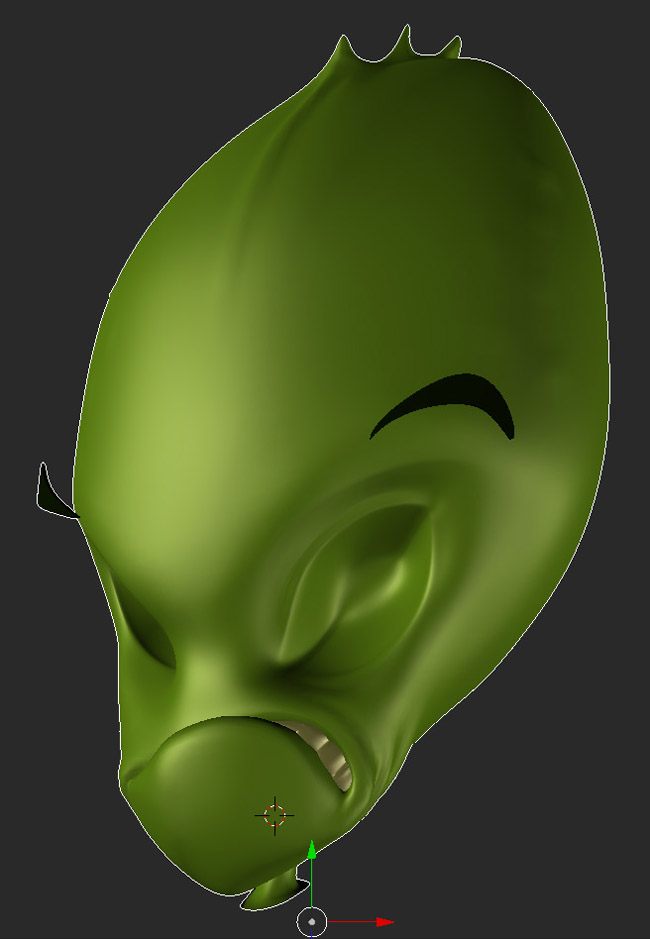
Fig. 05
Tip: Hide geometry you aren't working with. Your software will flow better in the viewport.
提示:隐藏你不是正在使用的几何体。你的软件将在视口运行的更好。
我继续工作在面部的细节。我添加边并挤出多边形来定义主要的部位:嘴,眼睛,鼻子和耳朵。我添加了一个细分表面(subdivision su***ce )修改器,测试在高模时角色效果。我使用雕刻工具和Multi Resolution 修改器直到我对这个基础模型满意。
Fig. 05
Tip: Hide geometry you aren't working with. Your software will flow better in the viewport.
提示:隐藏你不是正在使用的几何体。你的软件将在视口运行的更好。
Admin- Admin
- 帖子数 : 324
注册日期 : 14-07-10 -
![]()
![]()
回复: 创建“质子队长”Making Of 'Captain Proton'
![]() 由 Admin 周六 三月 28, 2015 12:06 am
由 Admin 周六 三月 28, 2015 12:06 am
Light and Shadow灯光与阴影
I did a first simple light rig to test my model aspect. I went with a more accurate light setup to start working with materials. It's very important to achieve a good light set up. All your work on the final image will depend on this.
我首先使用一个简单的灯光系统来检查我们的模型。当材质时我将使用更准确的灯光设置。建立一个好的灯光是非常重要的,你的工作将所有的最终图像将取决于此。
In this case I rendered the scene with Blender's internal renderer. I used five lights. The number of lights will depend on your scene. Maybe it seems a little complicated at first glance, but it's very useful to have the control with a light rig. Here are my lights:
在这种情况下,我使用Blender的内部渲染器渲染场景。我用了五个灯。灯的数量将取决于您的场景。也许这似乎乍一看有点复杂,但它是非常有用的,有一个灯光控制系统。这里有我的灯光:
1. A Sun light as a key light, with a yellow color 一个阳光(Sun)灯作为主光源,颜色为黄颜色
2. An orange hemi light as a fill light from the Sun 一个橙色的半球光(hemi )作为阳光的补光。
3. A blue hemi light as environment light 一个蓝色半球光作为环境光。
4. A blue point light for the lightning in the ray gun 一个蓝色的点光源( point)作为镭射枪的闪电
5. An area light to fake the bounced light color from the ground rock to the character. 一个平面光(area)制造从背景岩石反弹到角色的反弹光。
In the light properties you can select This Layer Only to affect only objects in the light layer. I used this to exclude the eyes from one light (Fig.06).
在灯光的属性,你可以选择这层只影响到在光层的唯一物体。我用这从一个光中( Fig.06 )排除眼睛。

Fig. 06
Tip: In the shadows color use the same as in the ambient color of the world. It will help you to make a believable light setup.
提示:阴影的颜色和世界的环境色相同。这将帮助你做出一个可信的灯光设置。
I did a first simple light rig to test my model aspect. I went with a more accurate light setup to start working with materials. It's very important to achieve a good light set up. All your work on the final image will depend on this.
我首先使用一个简单的灯光系统来检查我们的模型。当材质时我将使用更准确的灯光设置。建立一个好的灯光是非常重要的,你的工作将所有的最终图像将取决于此。
In this case I rendered the scene with Blender's internal renderer. I used five lights. The number of lights will depend on your scene. Maybe it seems a little complicated at first glance, but it's very useful to have the control with a light rig. Here are my lights:
在这种情况下,我使用Blender的内部渲染器渲染场景。我用了五个灯。灯的数量将取决于您的场景。也许这似乎乍一看有点复杂,但它是非常有用的,有一个灯光控制系统。这里有我的灯光:
1. A Sun light as a key light, with a yellow color 一个阳光(Sun)灯作为主光源,颜色为黄颜色
2. An orange hemi light as a fill light from the Sun 一个橙色的半球光(hemi )作为阳光的补光。
3. A blue hemi light as environment light 一个蓝色半球光作为环境光。
4. A blue point light for the lightning in the ray gun 一个蓝色的点光源( point)作为镭射枪的闪电
5. An area light to fake the bounced light color from the ground rock to the character. 一个平面光(area)制造从背景岩石反弹到角色的反弹光。
In the light properties you can select This Layer Only to affect only objects in the light layer. I used this to exclude the eyes from one light (Fig.06).
在灯光的属性,你可以选择这层只影响到在光层的唯一物体。我用这从一个光中( Fig.06 )排除眼睛。
Fig. 06
Tip: In the shadows color use the same as in the ambient color of the world. It will help you to make a believable light setup.
提示:阴影的颜色和世界的环境色相同。这将帮助你做出一个可信的灯光设置。
Admin- Admin
- 帖子数 : 324
注册日期 : 14-07-10 -
![]()
![]()
回复: 创建“质子队长”Making Of 'Captain Proton'
![]() 由 Admin 周日 三月 29, 2015 1:03 am
由 Admin 周日 三月 29, 2015 1:03 am
Materials 材质
The way you create your materials depends on the software, but the goal is always the same. You've got to reproduce the behavior of objects with light. The key words are absorption, reflection and refraction. There are also common techniques in any software. These techniques are very useful if you want to achieve a lot of different variations of materials. In real life most objects are made of more than one material. There are several layers of dust, rust etc.
创建材质的方法取决于你所用的软件,但但目标是始终不变的。你有重现对象的行为与灯光。关键词是吸收,反射和折射。也有在任何软件通用技术。如果你想实现材质许多不同的变化,这些技术是非常有用的。在现实生活中的大多数物体是由多于一种材质组成的。有几层灰尘,锈等。
The Material Editor is very powerful when combined with light setup and composition in CG. I use a lot of falloff ramps in the materials to control how the su***ce reacts with the light set up. I use a color for the specular reflection that matches with the main light color, and colors in fall off ramps on difuse or specular that match with the environment color. Doing this makes the scene more believable. You will see what I mean on the materials for the raygun and the eyes. The Blender node compositor for materials is very helpful and gives all the combinations you can imagine.
在CG中联合灯光系统和材质时材质编辑器是非常有用的。我在材质使用了许多衰减控制表面和灯光是如何反应的。我使用一个颜色给高光反射匹配主光源颜色,在difuse 和 specular的衰减匹配环境光颜色。让这个场景更加可信。你将明白我表示的是雷射枪和眼睛的材质。Blender 的合成节点材质是非常有用的和能够结合你所有能够想象的组合。
Tip: With characters, the eyes are very important. It's the first place a viewer will look so be careful to work hard on this area. A nice shader will help a lot! An example of this can be seen in Fig.07.
提示:角色的眼睛是非常重要的。这是观众第一个会看的地方,所以要小心,要认真工作在这个领域。一个很好的着色器将有很大的帮助!这方面的例子可以在Fig.07看出 。

Fig. 07
The way you create your materials depends on the software, but the goal is always the same. You've got to reproduce the behavior of objects with light. The key words are absorption, reflection and refraction. There are also common techniques in any software. These techniques are very useful if you want to achieve a lot of different variations of materials. In real life most objects are made of more than one material. There are several layers of dust, rust etc.
创建材质的方法取决于你所用的软件,但但目标是始终不变的。你有重现对象的行为与灯光。关键词是吸收,反射和折射。也有在任何软件通用技术。如果你想实现材质许多不同的变化,这些技术是非常有用的。在现实生活中的大多数物体是由多于一种材质组成的。有几层灰尘,锈等。
The Material Editor is very powerful when combined with light setup and composition in CG. I use a lot of falloff ramps in the materials to control how the su***ce reacts with the light set up. I use a color for the specular reflection that matches with the main light color, and colors in fall off ramps on difuse or specular that match with the environment color. Doing this makes the scene more believable. You will see what I mean on the materials for the raygun and the eyes. The Blender node compositor for materials is very helpful and gives all the combinations you can imagine.
在CG中联合灯光系统和材质时材质编辑器是非常有用的。我在材质使用了许多衰减控制表面和灯光是如何反应的。我使用一个颜色给高光反射匹配主光源颜色,在difuse 和 specular的衰减匹配环境光颜色。让这个场景更加可信。你将明白我表示的是雷射枪和眼睛的材质。Blender 的合成节点材质是非常有用的和能够结合你所有能够想象的组合。
Tip: With characters, the eyes are very important. It's the first place a viewer will look so be careful to work hard on this area. A nice shader will help a lot! An example of this can be seen in Fig.07.
提示:角色的眼睛是非常重要的。这是观众第一个会看的地方,所以要小心,要认真工作在这个领域。一个很好的着色器将有很大的帮助!这方面的例子可以在Fig.07看出 。
Fig. 07
Admin- Admin
- 帖子数 : 324
注册日期 : 14-07-10 -
![]()
![]()
回复: 创建“质子队长”Making Of 'Captain Proton'
![]() 由 Admin 周日 三月 29, 2015 2:47 am
由 Admin 周日 三月 29, 2015 2:47 am
UV
Before going with textures for the character or any object it's good to unfold the mesh in the UV editor.
It gives a mesh layout and is very easy to understand in 2D image editors. So you can use all the tools of Gimp or Photoshop to create nice and rich textures.
在我们为这个角色或其它的任何一个物体贴纹理,需要在UV编辑器展开网格。给网格一个UV布局对于2D图像编辑软件是更容易理解绘制纹理的。
所以,你可以使用的GIMP或Photoshop的所有工具来创建漂亮和富有质感的纹理。
Blender tools for UV editing are easy to find by pressing T or the Space bar in the 3D viewport. Select UV Editing to work on a UV layout. Any window with the UV/image editor active will show you the mesh when you select it and press Tab to enter Edit mode.
对于BlenderUV工具可以很容易在按T键或3D视图按空格键找到的。选择UV编辑器工作在一个UV布局。任何窗口和UV编辑器当你选择一个网格可以显示它,按TABenter Edit mode.
With the mesh in Edit mode you can press Space bar and write your actions if you know them, like Mark Seam or Unwrap. When you are happy with the seams you've marked, choose Unwrap. It gives you an automatic unfolded mesh that is usually very good. If you're not happy with the result you can always mark other seams (Fig.08).
在编辑模式下的网格,你可以按空格键,如果你知道它们,输入你的命令,像Mark Seam或Unwrap。当你很满意你标记的接缝,选择Unwrap(展开)。它为您提供自动展开网格,通常是非常不错的。如果你不满意结果,你总是可以标记其它的接缝(Fig.08).

Fig. 08
Tip: In Edit mode, select all the mesh faces by pressing A, then press U and the UV contextual menu will appear to unwrap your mesh.
提示:在编辑模式下,按A选择所有的网格面,然后按U在弹出的菜单将出现unwrap。
Before going with textures for the character or any object it's good to unfold the mesh in the UV editor.
It gives a mesh layout and is very easy to understand in 2D image editors. So you can use all the tools of Gimp or Photoshop to create nice and rich textures.
在我们为这个角色或其它的任何一个物体贴纹理,需要在UV编辑器展开网格。给网格一个UV布局对于2D图像编辑软件是更容易理解绘制纹理的。
所以,你可以使用的GIMP或Photoshop的所有工具来创建漂亮和富有质感的纹理。
Blender tools for UV editing are easy to find by pressing T or the Space bar in the 3D viewport. Select UV Editing to work on a UV layout. Any window with the UV/image editor active will show you the mesh when you select it and press Tab to enter Edit mode.
对于BlenderUV工具可以很容易在按T键或3D视图按空格键找到的。选择UV编辑器工作在一个UV布局。任何窗口和UV编辑器当你选择一个网格可以显示它,按TABenter Edit mode.
With the mesh in Edit mode you can press Space bar and write your actions if you know them, like Mark Seam or Unwrap. When you are happy with the seams you've marked, choose Unwrap. It gives you an automatic unfolded mesh that is usually very good. If you're not happy with the result you can always mark other seams (Fig.08).
在编辑模式下的网格,你可以按空格键,如果你知道它们,输入你的命令,像Mark Seam或Unwrap。当你很满意你标记的接缝,选择Unwrap(展开)。它为您提供自动展开网格,通常是非常不错的。如果你不满意结果,你总是可以标记其它的接缝(Fig.08).
Fig. 08
Tip: In Edit mode, select all the mesh faces by pressing A, then press U and the UV contextual menu will appear to unwrap your mesh.
提示:在编辑模式下,按A选择所有的网格面,然后按U在弹出的菜单将出现unwrap。
Admin- Admin
- 帖子数 : 324
注册日期 : 14-07-10 -
![]()
![]()
回复: 创建“质子队长”Making Of 'Captain Proton'
![]() 由 Admin 周日 三月 29, 2015 3:07 am
由 Admin 周日 三月 29, 2015 3:07 am
Sculpt for Key Areas 雕刻重点区域
Next I used the sculpt tools to define more areas, like the eyes, eyebrows, lips, nose and ears. I used the Multi Resolution modifier to work instead of the Subdivision Su***ce. This allowed me to go back and forward on the subdivision levels and work where I needed.
下一步我将使用雕刻工具定义更多的区域,如眼睛,眉毛,嘴唇,鼻子和耳朵。我将使用Multi Resolution修改器代替Subdivision Su***ce修改器工作。这个修改器可以在我工作在雕刻时,可以提高或调低细分级别。
A fast way to give expression to your character is to use the Sculpt tools. It's easier to create blend shapes (morphers in 3ds Max).
使用雕刻工具更快的表达你的角色。更容易创建混合的形状(在3DS MAX是morphers)。
Tip: When I'm finished with details I bake an Ambient Occlusion of the UV layout. I combine this in Multiply mode, low opacity with my color. This gives more depth to the model in the render.
提示:当我完成了我的细节,我烘培一个AO贴图。我将使用相乘模式,低的透明度和颜色贴图混合。给模型在渲染更多的细节。
Admin- Admin
- 帖子数 : 324
注册日期 : 14-07-10 -
![]()
![]()
回复: 创建“质子队长”Making Of 'Captain Proton'
![]() 由 Admin 周日 三月 29, 2015 3:11 am
由 Admin 周日 三月 29, 2015 3:11 am
3D Painted Textures 3D纹理绘画
I painted the textures in Blender over the models in the 3D viewport and in the UV/image editor. I also used the open source image editor Gimp.
我在Blender 直接绘制纹理在3D视图的模型上和在UV/图像编辑器。我也使用开源的GIMP来编辑图像。
Configure your lights in the viewport preview to work. Activate the Solid option to display the object with one texture and lit with the default OpenGL lights. You can edit the OpenGL lights in the Blender user Preferences > System (Fig.09a - 09b).
在你的视图预览(viewport preview)为你的工作配置照明。激活显示物体的Solid 选项在 texture 和 lit 使用默认的OpenGL光照。你也可以在Blender的user Preferences > System编辑OpenGL光照。(Fig.09a - 09b).

Fig.09a

Fig. 09b
You can also use your scene light setup to light your object. 3D Viewport > View Properties Menu "N" Shading > GLSL, then choose the method to display the object texture or press Alt + Z (Fig.10).
您还可以使用场景的灯光设置照亮你的对象。 3D Viewport > View Properties Menu "N" Shading > GLSL, 然后选择显示模式texture或快捷键Alt + Z (Fig.10).
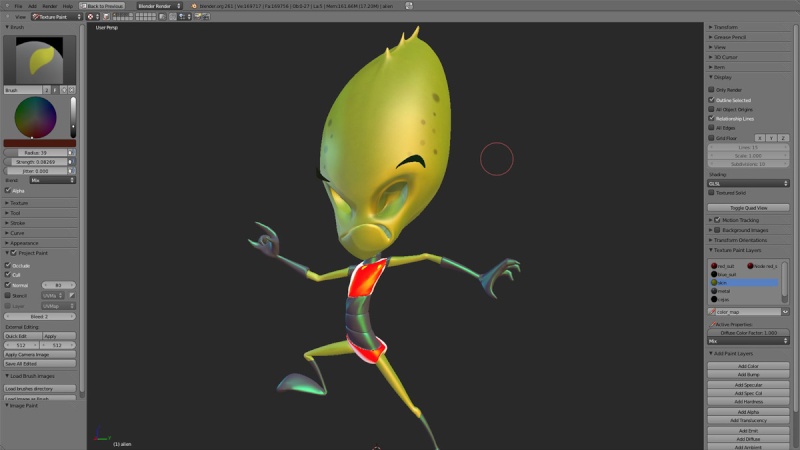
Fig. 10
Activate this add-on: Paint > Texture Paint > Layer Manager to use the texture paint layers. This tool will appear in the 3D Viewport > View Properties menu (press N) (Fig.11).
激活这个插件:Paint > Texture Paint > Layer Manager 使用纹理绘画层(texture paint layers)。这个工具将显示在3D Viewport > View Properties menu (press N) (Fig.11).
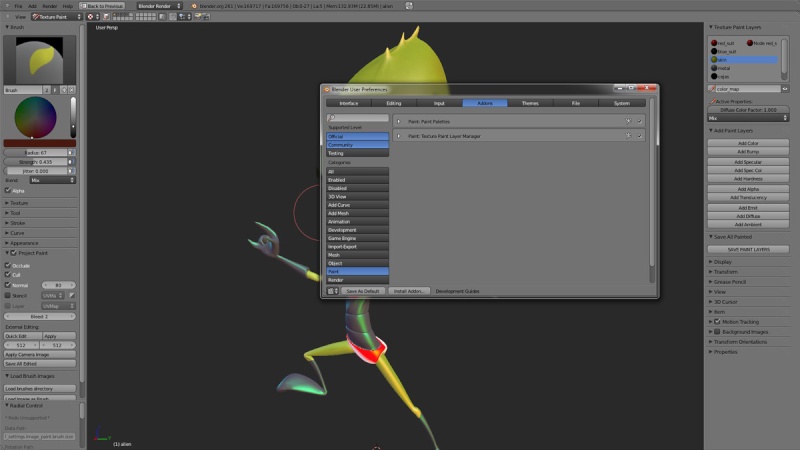
Fig. 11
Activate Texture Paint in Object mode. This will display the tools in the menu (press T) with all you need to paint in the 3D viewport.
在物体模式激活纹理绘画。这将显示所有你所有需要在3D视图绘画的工具在菜单(快捷键T)。
Assign a material to the object selected. Choose the Blender UV Editing layout. In the 3D viewport press Tab to select all the faces. The UV/image editor will show the model UVs. Create a new texture and use it in the material you assigned to the object as Influence > Color. Remember to use Mapping > UV.
指定材质给选择的物体。选择Blender UV Editing 布局,在3D视图按TAB键选择所有的面。在UV /图像编辑器将显示该模型的UV。创建一个新的纹理并使用到你到指定物体的材质作为 Influence > Color。记得使用Mapping > U。
Press F to control the brush's radius. Press Shift + F to control the brush's influence (Fig.12).
按F键控制笔刷的半径。按Shift + F控制笔刷的影响(Fig.12).
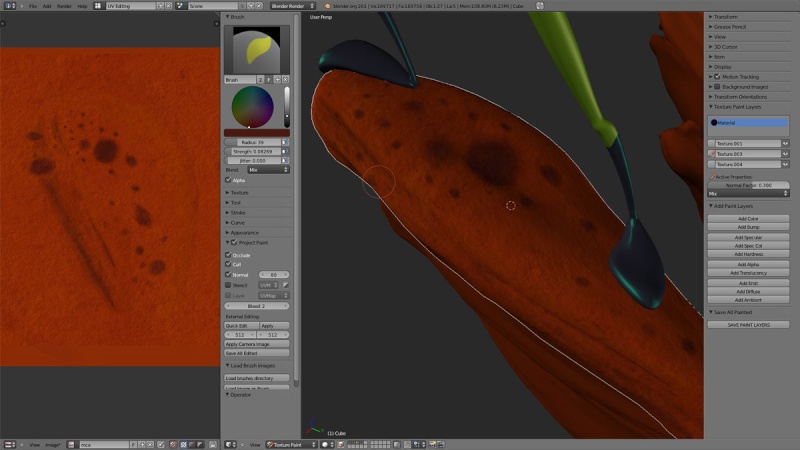
Fig.12
I painted the textures in Blender over the models in the 3D viewport and in the UV/image editor. I also used the open source image editor Gimp.
我在Blender 直接绘制纹理在3D视图的模型上和在UV/图像编辑器。我也使用开源的GIMP来编辑图像。
Configure your lights in the viewport preview to work. Activate the Solid option to display the object with one texture and lit with the default OpenGL lights. You can edit the OpenGL lights in the Blender user Preferences > System (Fig.09a - 09b).
在你的视图预览(viewport preview)为你的工作配置照明。激活显示物体的Solid 选项在 texture 和 lit 使用默认的OpenGL光照。你也可以在Blender的user Preferences > System编辑OpenGL光照。(Fig.09a - 09b).
Fig.09a
Fig. 09b
You can also use your scene light setup to light your object. 3D Viewport > View Properties Menu "N" Shading > GLSL, then choose the method to display the object texture or press Alt + Z (Fig.10).
您还可以使用场景的灯光设置照亮你的对象。 3D Viewport > View Properties Menu "N" Shading > GLSL, 然后选择显示模式texture或快捷键Alt + Z (Fig.10).
Fig. 10
Activate this add-on: Paint > Texture Paint > Layer Manager to use the texture paint layers. This tool will appear in the 3D Viewport > View Properties menu (press N) (Fig.11).
激活这个插件:Paint > Texture Paint > Layer Manager 使用纹理绘画层(texture paint layers)。这个工具将显示在3D Viewport > View Properties menu (press N) (Fig.11).
Fig. 11
Activate Texture Paint in Object mode. This will display the tools in the menu (press T) with all you need to paint in the 3D viewport.
在物体模式激活纹理绘画。这将显示所有你所有需要在3D视图绘画的工具在菜单(快捷键T)。
Assign a material to the object selected. Choose the Blender UV Editing layout. In the 3D viewport press Tab to select all the faces. The UV/image editor will show the model UVs. Create a new texture and use it in the material you assigned to the object as Influence > Color. Remember to use Mapping > UV.
指定材质给选择的物体。选择Blender UV Editing 布局,在3D视图按TAB键选择所有的面。在UV /图像编辑器将显示该模型的UV。创建一个新的纹理并使用到你到指定物体的材质作为 Influence > Color。记得使用Mapping > U。
Press F to control the brush's radius. Press Shift + F to control the brush's influence (Fig.12).
按F键控制笔刷的半径。按Shift + F控制笔刷的影响(Fig.12).
Fig.12
由Admin于周日 三月 29, 2015 1:31 pm进行了最后一次编辑,总共编辑了1次
Admin- Admin
- 帖子数 : 324
注册日期 : 14-07-10 -
![]()
![]()
回复: 创建“质子队长”Making Of 'Captain Proton'
![]() 由 Admin 周日 三月 29, 2015 12:54 pm
由 Admin 周日 三月 29, 2015 12:54 pm
The Pose
The pose was sculpted with the Move tool. Like when painting, I used the F key to control the radius of my brush and the Shift + F to control the influence. Take care of your object distance in the viewport. It will affect the area of influence.
使用移动工具雕刻姿势。像你在绘画时。我使用F键控制笔刷半径,然后按Shift + F控制笔刷的影响。注意你的物体在视图的距离。它会影响influence的区域。
It was very important to show a good pose with a clear line of action. A nice shape and a strong silhouette helps you to read an image.
有一条明显的作用线对于显示一个好的姿势是很重要的,一个好的形状和一个强烈的剪影帮助你阅读图像。
The facial expression was sculpted with details to give the character emotion that matched his actions. The cloth wrinkles were also done at this stage. I sculpted the wrinkles on the space suit depending on his movement.
面部表情雕刻是给角色情绪的细节匹配它的动作。衣服的皱纹也在这个阶段。我雕刻太空服皱纹取决于它的动作。
Admin- Admin
- 帖子数 : 324
注册日期 : 14-07-10 -
![]()
![]()
回复: 创建“质子队长”Making Of 'Captain Proton'
![]() 由 Admin 周日 三月 29, 2015 1:07 pm
由 Admin 周日 三月 29, 2015 1:07 pm
Render 渲染
I used these parameters in the render and environment menu (Fig.13).
我使用渲染和环境菜单的这些参数(Fig.13).
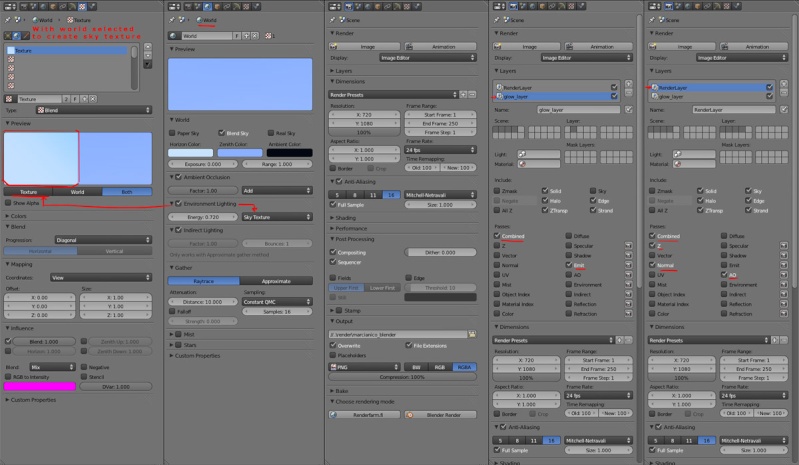
Fig. 13
I rendered two layers: one layer for the entire scene and another for the glows. Each one had its own passes for compositing later.
我渲染为两层:一层是整个场景,另一层是发光层(glows)。每一个都有自己的通道为后面的合成。
Tip: To do preview renders, use a small output size and lower the render AA samples and the shadows samples on every light. You can use the Properties > Scene > Simply options too.
要预览渲染,用一个小的输出尺寸和降低渲染AA采样和每个灯光的采样。您也可以使用Properties > Scene > Simply。
I used these parameters in the render and environment menu (Fig.13).
我使用渲染和环境菜单的这些参数(Fig.13).
Fig. 13
I rendered two layers: one layer for the entire scene and another for the glows. Each one had its own passes for compositing later.
我渲染为两层:一层是整个场景,另一层是发光层(glows)。每一个都有自己的通道为后面的合成。
Tip: To do preview renders, use a small output size and lower the render AA samples and the shadows samples on every light. You can use the Properties > Scene > Simply options too.
要预览渲染,用一个小的输出尺寸和降低渲染AA采样和每个灯光的采样。您也可以使用Properties > Scene > Simply。
由Admin于周日 三月 29, 2015 1:33 pm进行了最后一次编辑,总共编辑了2次
Admin- Admin
- 帖子数 : 324
注册日期 : 14-07-10 -
![]()
![]()
回复: 创建“质子队长”Making Of 'Captain Proton'
![]() 由 Admin 周日 三月 29, 2015 1:09 pm
由 Admin 周日 三月 29, 2015 1:09 pm
Composition 合成
The rendering for this image was very simple and it didn't use GI with radiosity. So a node composition was used to achieve a nicer image:
渲染这个图像是非常简单的,它没有使用GI和辐射。所以一个节点合成被用来实现更好的图像:
- An Ambient Occlusion pass was a very good way to add depth. This allowed me to do a subtle color bleed effect. I added a RGB Curves node to the AO to match the ambient light color.
一个AO通道是非常好的增加深度的方法。这允许我们添加微妙的渗色效果。我添加一个RGB 曲线节点给AO匹配环境光的颜色。
- A Normal pass to light the objects in the composition with ambient light later.
一个发现通道照明物体在合成是在环境光之后的。
- Render Layer with the Emit pass for the gun lightning and glows.
使用Emit通道渲染层得到雷射枪的照明和发光效果。
Some effects were added later in Gimp to finish the image. Like a subtle depth of field (Fig.14).
有一些效果我们将在GIMP来完成。像微妙的景深效果(Fig.14).
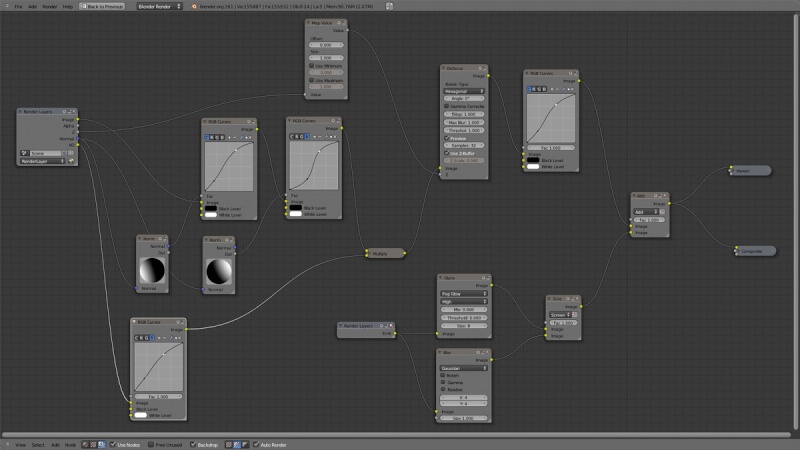
Fig. 14
And here's the final image (Fig.15).
这是最终图像(Fig.15).

Fig. 15
I hope you enjoyed this Making Of. I'm going to do a series of workshops in Barcelona (Spain) where I will explain in Spanish the techniques more in depth. I will teach the software Blender in this process with the problems I had to solve. Feel free to contact me.
我希望你喜欢这个制作特辑。我将会在巴塞罗(西班牙)那会做一系列的研讨会,在西班牙那里我会解释更加深入的技术。我将教导在此过程中与我不得不解决这些Blender 软件的问题。随时联系我。
The rendering for this image was very simple and it didn't use GI with radiosity. So a node composition was used to achieve a nicer image:
渲染这个图像是非常简单的,它没有使用GI和辐射。所以一个节点合成被用来实现更好的图像:
- An Ambient Occlusion pass was a very good way to add depth. This allowed me to do a subtle color bleed effect. I added a RGB Curves node to the AO to match the ambient light color.
一个AO通道是非常好的增加深度的方法。这允许我们添加微妙的渗色效果。我添加一个RGB 曲线节点给AO匹配环境光的颜色。
- A Normal pass to light the objects in the composition with ambient light later.
一个发现通道照明物体在合成是在环境光之后的。
- Render Layer with the Emit pass for the gun lightning and glows.
使用Emit通道渲染层得到雷射枪的照明和发光效果。
Some effects were added later in Gimp to finish the image. Like a subtle depth of field (Fig.14).
有一些效果我们将在GIMP来完成。像微妙的景深效果(Fig.14).
Fig. 14
And here's the final image (Fig.15).
这是最终图像(Fig.15).
Fig. 15
I hope you enjoyed this Making Of. I'm going to do a series of workshops in Barcelona (Spain) where I will explain in Spanish the techniques more in depth. I will teach the software Blender in this process with the problems I had to solve. Feel free to contact me.
我希望你喜欢这个制作特辑。我将会在巴塞罗(西班牙)那会做一系列的研讨会,在西班牙那里我会解释更加深入的技术。我将教导在此过程中与我不得不解决这些Blender 软件的问题。随时联系我。
Admin- Admin
- 帖子数 : 324
注册日期 : 14-07-10 -
![]()
![]()
![]()
您在这个论坛的权限:
您不能在这个论坛回复主题