如何在 Blender创建印花玻璃杯第二部分 How to Engrave Glass in Blender: Part 2
 如何在 Blender创建印花玻璃杯第二部分 How to Engrave Glass in Blender: Part 2

In the second part of our glass tutorial we'll learn how to set up and render a realistic glass shader in Blender, and discover how to enrich our scenes with some simple cloth simulation. Be sure to read the first part of this tutorial before starting.
在我们的玻璃杯教程我们将学习怎么建立和渲染一个真实的玻璃杯,并研究使用一些简单的布料模拟来丰富场景。请务必在开始前阅读本教程的第一部分。
Lighting and Scene Setup 照明和场景设置
For this scene we will use the classic 3-point lighting in a light box. Add a plane on the top of the glasses and set it as an emission shader (strength 1.5). Add an emission plane on the left side (warm light, strength 1) and another on the right side (cold light, strength 2). Now add some planes and create a light box. Set the material as a white diffuse shader.
对于这个场景我们将使用经典的三点照明灯箱。在玻璃杯的顶部添加一个平面并设置它为发光着色器(emission shader)strength 为1.5.添加一个发光平面在左边(设置为暖色光,strength 为 1)另一个在右边(冷光,strength 为 2)。现在添加一些平面创建照明灯箱.设置材质为白色的漫反射着色器(white diffuse )。

Light and setup your scene in Blender
在Blender你的场景照明设置
 回复: 如何在 Blender创建印花玻璃杯第二部分 How to Engrave Glass in Blender: Part 2
Glass and Wine Materials 玻璃和酒材质
Select Cycles as the render engine and in Object mode, select a glass and add a new material. Use a glass shader, with the index of refraction set to 1.47 and color RGB (0,99; 0,99; 0,99). Add another material to the object (with the same glass shader) and call it "engraved_glass". Add to the engraved_glass material the texture created in step 4 and connect the texture node to the displacement material output.
在物体模式,并选择 Cycles作为渲染引擎,选择其中的一个玻璃杯并给它添加一个新的材质。使用一个玻璃着色器(glass shader),
折射率(index of refraction )设置为1.47RGB颜色为(0,99; 0,99; 0,99).添加另外一个材质给物体【使用同样的玻璃着色器(glass shader)】并命名为"engraved_glass"。添加前面创建的纹理给engraved_glass材质并连接纹理(texture)节点到置换(displacement )材质的输出。
I usually use a math node to adjust the displacement level. In Edit mode, select the areas where you want the engravings and click Assign to the Material. If you want to change the size of the texture, add a node map.
我常常使用一个数学(math)节点来校正置换(displacement)级别。在编辑模式,选择您想要的雕刻区域,然后单击 Assign指定材质。如果你想改变纹理的大小,添加一个节点贴图(node map)。
Now select the wine material and use a glass shader with IOR set as 1.33, and color red.
现在选择葡萄酒材质并添加一个IOR为1.33的玻璃着色器(glass shader),颜色为红色。

Blender material settings
Blender 材质设置
Select Cycles as the render engine and in Object mode, select a glass and add a new material. Use a glass shader, with the index of refraction set to 1.47 and color RGB (0,99; 0,99; 0,99). Add another material to the object (with the same glass shader) and call it "engraved_glass". Add to the engraved_glass material the texture created in step 4 and connect the texture node to the displacement material output.
在物体模式,并选择 Cycles作为渲染引擎,选择其中的一个玻璃杯并给它添加一个新的材质。使用一个玻璃着色器(glass shader),
折射率(index of refraction )设置为1.47RGB颜色为(0,99; 0,99; 0,99).添加另外一个材质给物体【使用同样的玻璃着色器(glass shader)】并命名为"engraved_glass"。添加前面创建的纹理给engraved_glass材质并连接纹理(texture)节点到置换(displacement )材质的输出。
I usually use a math node to adjust the displacement level. In Edit mode, select the areas where you want the engravings and click Assign to the Material. If you want to change the size of the texture, add a node map.
我常常使用一个数学(math)节点来校正置换(displacement)级别。在编辑模式,选择您想要的雕刻区域,然后单击 Assign指定材质。如果你想改变纹理的大小,添加一个节点贴图(node map)。
Now select the wine material and use a glass shader with IOR set as 1.33, and color red.
现在选择葡萄酒材质并添加一个IOR为1.33的玻璃着色器(glass shader),颜色为红色。

Blender material settings
Blender 材质设置
 回复: 如何在 Blender创建印花玻璃杯第二部分 How to Engrave Glass in Blender: Part 2
Cloth Simulation 布料模拟
Now we'll add a small cloth simulation to our render. Search online to find a fabric texture (or create one with the internal render engine) and save it. Add a plane, and in Edit mode, subdivide it 5 times. From the top view (7 key) go to U key > Unwrap from View.
现在我们将为渲染添加一些布料模拟。在网上搜索找到了面料纹理(或使用内部渲染引擎创建一个),并保存它。添加一个平面,在编辑模式细分5次。切换到顶视图(数字键7)并按U键选择Unwrap from View.
Add a diffuse material and use the fabric texture as the color input. In the Physics panel, enable Cloth, select Cotton from the preset materials and turn on Self Collision. Select the plane under glasses and in the Physics panel, set it to Collision. Rotate the cloth by 90 degrees and bake the simulation.
添加一个漫反射材质(diffuse material)并使用面料纹理(fabric texture)作为颜色输出(color input)。在物理(Physics)面板,激活Cloth(布料),从预设的材质选择Cotton(棉)并打开Self Collision(自碰撞)。选择玻璃杯下面的平面并在物理(Physics)面板,点击Collision(碰撞)。旋转布料90度并烘焙模拟。

Cloth material and simulation baking
布料材质和模拟烘培
Now we'll add a small cloth simulation to our render. Search online to find a fabric texture (or create one with the internal render engine) and save it. Add a plane, and in Edit mode, subdivide it 5 times. From the top view (7 key) go to U key > Unwrap from View.
现在我们将为渲染添加一些布料模拟。在网上搜索找到了面料纹理(或使用内部渲染引擎创建一个),并保存它。添加一个平面,在编辑模式细分5次。切换到顶视图(数字键7)并按U键选择Unwrap from View.
Add a diffuse material and use the fabric texture as the color input. In the Physics panel, enable Cloth, select Cotton from the preset materials and turn on Self Collision. Select the plane under glasses and in the Physics panel, set it to Collision. Rotate the cloth by 90 degrees and bake the simulation.
添加一个漫反射材质(diffuse material)并使用面料纹理(fabric texture)作为颜色输出(color input)。在物理(Physics)面板,激活Cloth(布料),从预设的材质选择Cotton(棉)并打开Self Collision(自碰撞)。选择玻璃杯下面的平面并在物理(Physics)面板,点击Collision(碰撞)。旋转布料90度并烘焙模拟。

Cloth material and simulation baking
布料材质和模拟烘培
 回复: 如何在 Blender创建印花玻璃杯第二部分 How to Engrave Glass in Blender: Part 2
Render Setup 渲染设置
Place the glasses in your scene using your creative eye, and then add an empty object - call it "track". Select the first camera and then the empty object, and click Ctrl + T > Track to Constraint. Now the camera should point to the empty object.
使用你的creative eye放置玻璃杯在你的场景,然后添加一个空物体-叫做"track". 选择第一个相机然后选择空物体,快捷键Ctrl + T选择Track to Constraint。现在相机应该指向空物体。
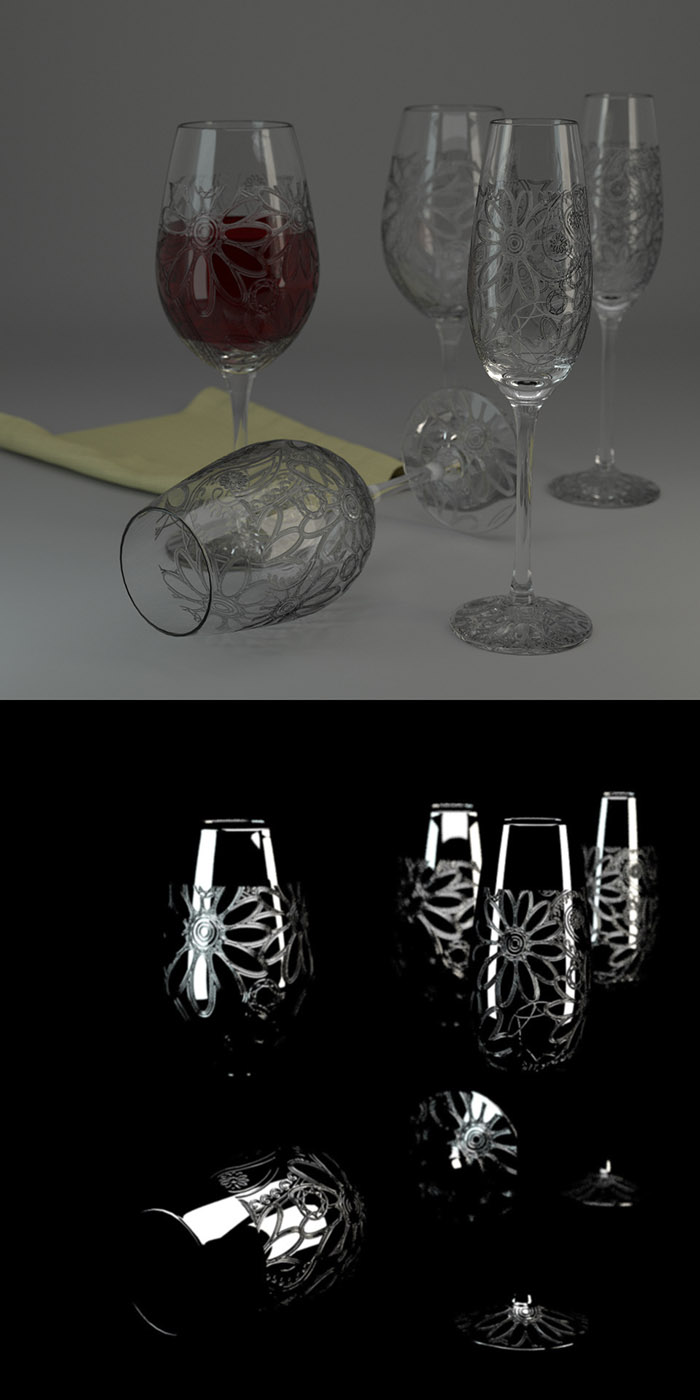
Add a second empty object (focus) and place it on the subject you want to focus on. In the Render Layer tab, turn on the Direct Glossy channel and in the Render tab, set Render Samples to 1000 and Resolution to 1920 x 1920. Select the camera, open the Object Data panel and select Focus in the Depth of Field tab. Set Radius as 0.05 and Blades to 5. In the World tab, set Strength as 0. Now press F12 and wait for the end of render (coffee time!)
添加第二个空对象(焦点),并把它放在你想要关注焦点。在渲染层选项卡,打开 Direct Glossy 通道,在渲染选项卡,设置渲染采样(render Samples )为1000分辨率(Resolution)为1920 x 1920.选择相机,打开Object Data (对象数据)面板,选择Depth of Field 的 Focus。设置Radius 为0.05,Blades为5.在World 选项卡,设置Strength为0.现在按F12等待渲染结束(可以喝杯咖啡)。

The composite and glossy direct render
合成和glossy direct渲染
Place the glasses in your scene using your creative eye, and then add an empty object - call it "track". Select the first camera and then the empty object, and click Ctrl + T > Track to Constraint. Now the camera should point to the empty object.
使用你的creative eye放置玻璃杯在你的场景,然后添加一个空物体-叫做"track". 选择第一个相机然后选择空物体,快捷键Ctrl + T选择Track to Constraint。现在相机应该指向空物体。
Add a second empty object (focus) and place it on the subject you want to focus on. In the Render Layer tab, turn on the Direct Glossy channel and in the Render tab, set Render Samples to 1000 and Resolution to 1920 x 1920. Select the camera, open the Object Data panel and select Focus in the Depth of Field tab. Set Radius as 0.05 and Blades to 5. In the World tab, set Strength as 0. Now press F12 and wait for the end of render (coffee time!)
添加第二个空对象(焦点),并把它放在你想要关注焦点。在渲染层选项卡,打开 Direct Glossy 通道,在渲染选项卡,设置渲染采样(render Samples )为1000分辨率(Resolution)为1920 x 1920.选择相机,打开Object Data (对象数据)面板,选择Depth of Field 的 Focus。设置Radius 为0.05,Blades为5.在World 选项卡,设置Strength为0.现在按F12等待渲染结束(可以喝杯咖啡)。

The composite and glossy direct render
合成和glossy direct渲染
 回复: 如何在 Blender创建印花玻璃杯第二部分 How to Engrave Glass in Blender: Part 2
Post-production 后期制作
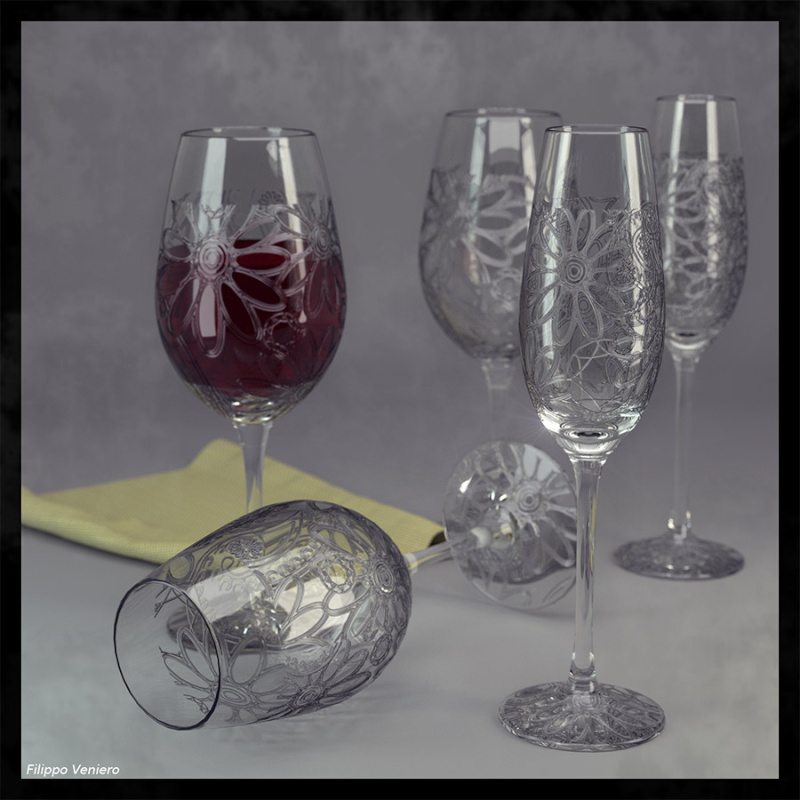
Open you've composited your image in GIMP, adjust the Levels and Curves, add a new layer with glossy direct image, and set the blending mode to Addition. I usually use an airbrush and a dirty texture to improve the realism of my images. Add your signature, et viola!
使用GIMP打开你的composited渲染,调整色阶和曲线,使用glossy direct图像添加一个新层,设置混合模式为相加。我通常使用的喷枪笔刷和做旧纹理来改善图像的真实感。 Add your signature, et viola!

The final render
最终渲染
Open you've composited your image in GIMP, adjust the Levels and Curves, add a new layer with glossy direct image, and set the blending mode to Addition. I usually use an airbrush and a dirty texture to improve the realism of my images. Add your signature, et viola!
使用GIMP打开你的composited渲染,调整色阶和曲线,使用glossy direct图像添加一个新层,设置混合模式为相加。我通常使用的喷枪笔刷和做旧纹理来改善图像的真实感。 Add your signature, et viola!

The final render
最终渲染
 回复: 如何在 Blender创建印花玻璃杯第二部分 How to Engrave Glass in Blender: Part 2
Top Tip: Glass Shader and Render Bounces 提示:玻璃着色器和渲染跳动
When we have a glass material in a render we must set light bounces in the Render tab as the number of su***ces that light has to cross. In the image we have 5 glass meshes; if we want the light passes to go through all 5 su***ces we must set bounces as 5 x 2 = 10.
当我们在渲染有有一个玻璃材质我们必须在渲染选项卡设置灯光反弹(light bounces )作为灯光通过表面的次数。在这个图像我们有5个玻璃杯;如果我们需要灯光穿过所有的表面我们必须设置反弹(bounces)为 5 x 2 = 10.

Different bounces in the render settings
在渲染设置的不同反弹
When we have a glass material in a render we must set light bounces in the Render tab as the number of su***ces that light has to cross. In the image we have 5 glass meshes; if we want the light passes to go through all 5 su***ces we must set bounces as 5 x 2 = 10.
当我们在渲染有有一个玻璃材质我们必须在渲染选项卡设置灯光反弹(light bounces )作为灯光通过表面的次数。在这个图像我们有5个玻璃杯;如果我们需要灯光穿过所有的表面我们必须设置反弹(bounces)为 5 x 2 = 10.

Different bounces in the render settings
在渲染设置的不同反弹
您在这个论坛的权限:
您不能在这个论坛回复主题