使用Blender和Mitsuba创建真实的玻璃杯子 Create a glass with Blender and Mitsuba
 使用Blender和Mitsuba创建真实的玻璃杯子 Create a glass with Blender and Mitsuba
由Admin于周六 三月 21, 2015 9:06 pm进行了最后一次编辑,总共编辑了1次
 回复: 使用Blender和Mitsuba创建真实的玻璃杯子 Create a glass with Blender and Mitsuba
In this tutorial I'll show you how to use Mitsuba in Blender to create a physically correct glass cup. Mitsuba is an open source, physically-based renderer, runs on Linux, Mac OS X, Windows and is extremely modular. Many rendering techniques are available (direct illumination, path tracer, bidirectional path trace, photon map and so on). It supports volume rendering and the most commonly used scattering models (rough glass, plastic, metal).
在这个指南里,我将为了展示如何在Blender使用Mitsuba渲染器来创建一个物理精确的杯子。Mitsuba是一个开源的的基于物理的渲染器,可以运行在Linux, Mac OS X, Windows系统并且是高度模块化的。许多的渲染技术是可用的(直接照明,路径追踪,双向路径 追踪,光子贴图等)。它支持体积渲染和太多的散射模型(粗糙的玻璃,塑料,金属)。
Download the Mitsuba software and the plug-in for Blender. Now install Mitsuba, unzip the plug-in and copy the folder called Mitsuba into Blender/2.69/scripts/addons.
下载Mitsuba软件和plug-in for Blender。现在安装Mitsuba,解压(插件)plug-in并复制Mitsuba 到文件夹到Blender/2.69/scripts/addons.。
 回复: 使用Blender和Mitsuba创建真实的玻璃杯子 Create a glass with Blender and Mitsuba
Modeling the glass 玻璃杯建模
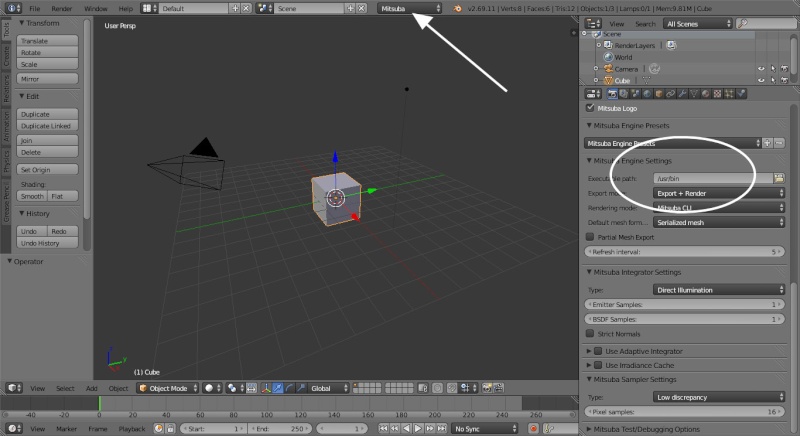
Open Blender and enable Mitsuba (File > User Preferences > Addons). Change the render engine from Blender to Mitsuba and write the path of the executable file in the Executable Path field.
打开Blender并激活Mitsuba(File > User Preferences > Addons). 将渲染引擎改为Mitsuba,并在Executable Path选项输入可执行文件文件的路径。
Delete the default cube and add a circle of 16 vertices. Enter Edit mode and extrude along the Z axis and scale just a little. Close the bottom of the glass and model the inside, then add Subdivision Su***ce modifier (level 2) and set the Shading to smooth. Call this mesh 'Glass'.
删除默认的立方体(cube)物体并添加一个16个顶点的circle。进入编辑模式,并沿Z轴挤出和缩放一点点。并封闭玻璃杯底部和完成内部的建模,然后添加细分表面(Subdivision Su***ce)修改器,层级设置为2,并设置着色为光滑smooth.命名网格为'Glass'.


Modeling the glass玻璃杯建模
Open Blender and enable Mitsuba (File > User Preferences > Addons). Change the render engine from Blender to Mitsuba and write the path of the executable file in the Executable Path field.
打开Blender并激活Mitsuba(File > User Preferences > Addons). 将渲染引擎改为Mitsuba,并在Executable Path选项输入可执行文件文件的路径。
Delete the default cube and add a circle of 16 vertices. Enter Edit mode and extrude along the Z axis and scale just a little. Close the bottom of the glass and model the inside, then add Subdivision Su***ce modifier (level 2) and set the Shading to smooth. Call this mesh 'Glass'.
删除默认的立方体(cube)物体并添加一个16个顶点的circle。进入编辑模式,并沿Z轴挤出和缩放一点点。并封闭玻璃杯底部和完成内部的建模,然后添加细分表面(Subdivision Su***ce)修改器,层级设置为2,并设置着色为光滑smooth.命名网格为'Glass'.


Modeling the glass玻璃杯建模
 回复: 使用Blender和Mitsuba创建真实的玻璃杯子 Create a glass with Blender and Mitsuba
Create the water 水模型建模
In Edit mode, select the vertices inside the glass and separate them ( P > by selection ). Call this part 'water'. Now select the vertices of the first edge loop, duplicate and separate them: call this new mesh 'water_top'. Close them by extruding and scaling and don't forget the meniscus (the curve in the upper su***ce of the liquid against the side of the glass). Check the mesh's Normals – it's very important that they are consistent and face the same direction!
在编辑模式,选择玻璃杯子里面的顶点并通过按P键独立出它们。命名这个部分为'water'.现在选择的第一个循环边的顶点,复制和独立它们:这个新的网格命名为'water_top'.通过挤压和缩放封闭它们还有不要忘记meniscus(在玻璃侧边对面的液体的上表面的曲线)。检查网格的法线 - 这是非常重要的,确保它们是一致的,面向着相同的方向!


 回复: 使用Blender和Mitsuba创建真实的玻璃杯子 Create a glass with Blender and Mitsuba
Add bubbles and straw 加入气泡和吸管
On another layer, create 2 or 3 bubbles and add them to a group called bubbles. Duplicate the water mesh, scale it just a little and add a particles system. Set Type as Hair and Emit From Faces. In the render tab of the particles system, deselect Emitters and add the bubbles group. Now add a circle ( with 8 vertices) and extrude along the Z axis. Add some Loop Cut and set Subdivision Su***ce to level 2 and solidify modifier. In Object mode, set shading as smooth and put it inside the glass.
在另一层,创建2个或3个气泡,并将它们添加到一个名为泡泡(bubbles)的组。复制水网格,缩放它一点点并添加一个粒子系统。设置类型(Type)为Hair 并且发射来自面。在粒子系统的渲染选项卡,取消选择Emitters并添加泡沫(bubbles)组。现在添加一个8个顶点的圆形(circle)并沿着Z轴挤出。添加一些循环切割,设置Subdivision Su***ce 为2,并添加一个solidify修改器。在物体模式,设置shading选项为smooth,把它放在玻璃杯里面。

由Admin于周六 三月 21, 2015 11:13 pm进行了最后一次编辑,总共编辑了2次 (原因 : 2)
 回复: 使用Blender和Mitsuba创建真实的玻璃杯子 Create a glass with Blender and Mitsuba
Materials 材质
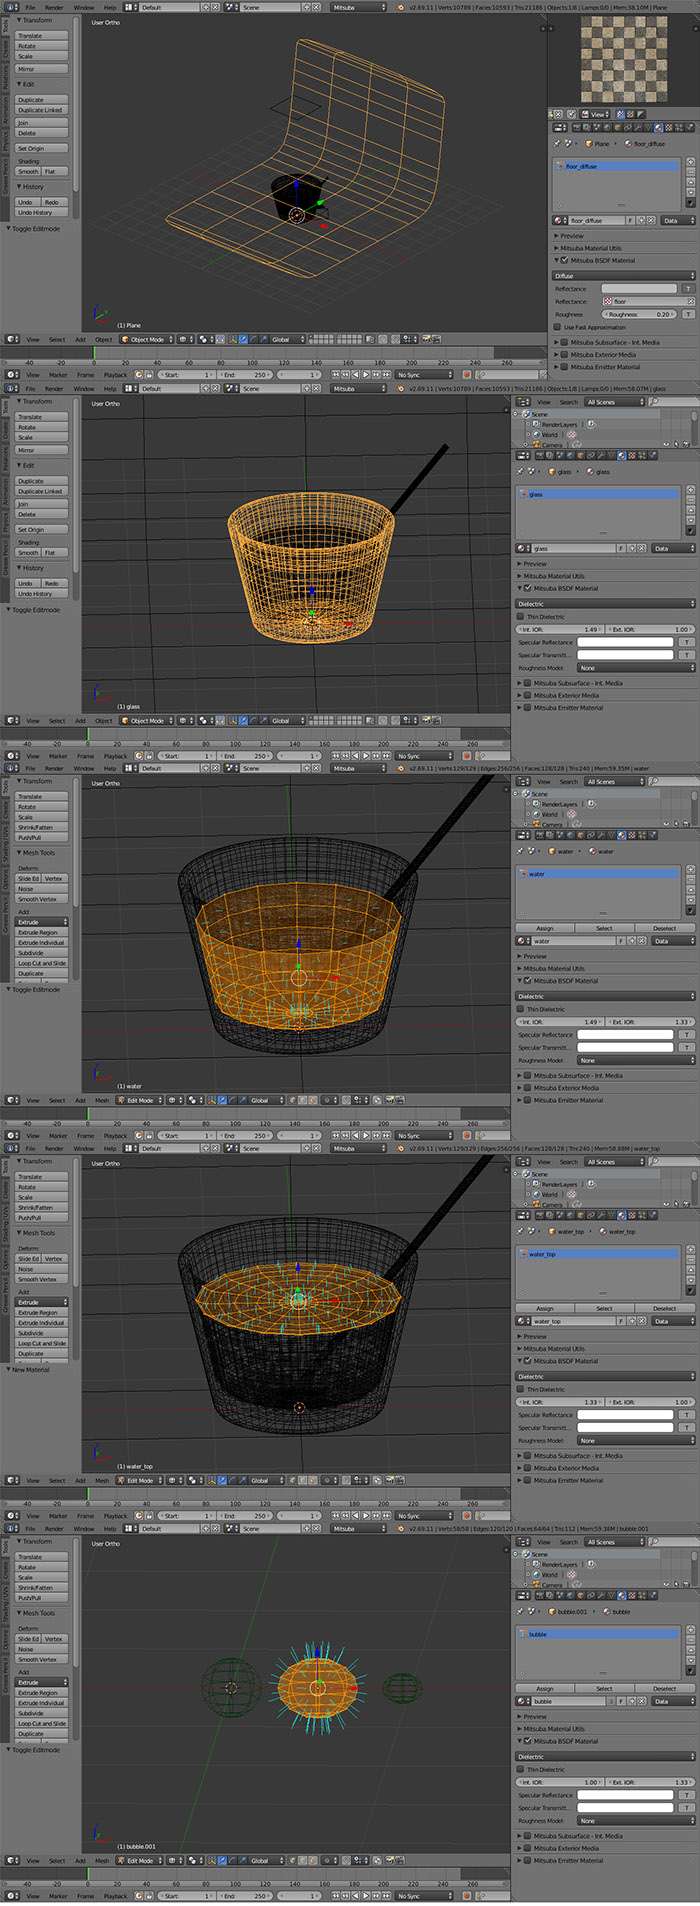
Add a plane as in the image below, enter Edit mode and Unwrap. In Object mode, add a new diffuse material and then add a floor texture in the Texture tab. Come back into material tab, click on the T button (at the right of the reflectance color) and select the floor texture. Select the glass and add a dielectric material: set interior IOR as 1.49 and exterior as 1.00. Select the water, add another dielectric material (interior IOR 1.49 and exterior 1.33 – and be sure that the Normals are oriented the same as the image below).
添加一个平面,如下图所示,进入编辑模式,并展开UV。在对象模式下,添加一个新的漫反射材质,然后在纹理(Texture)选项卡中添加一个地板纹理(floor texture)。返回到材质(material )选项卡,按T按钮(在反射reflectance 颜色的右侧),选择地板纹理( floor texture ).选择玻璃杯添加一个绝缘体(dielectric)材质 :设置interior IOR为1.49。exterior 为1.00.选择水物体,添加另一个绝缘体(dielectric)材质,nterior IOR为1.49。exterior 为1.33.确保法线和下图朝向一样。
Enter interior IOR 1.33 and exterior 1.00 for the top of the water, and interior IOR 1.00, exterior 1.49 for the bubbles. Select the straw and add a white plastic material, then add a red plastic material and (in Edit mode) assign it to the right faces.
为顶部的水面物体输入interior IOR 1.33和exterior 1.00,bubbles IOR 1.00, exterior 1.49 。选择吸管,并添加一个白色的塑料材质,然后添加一个红色的塑料材质(在编辑模式下),将其分配给右边的面。

 回复: 使用Blender和Mitsuba创建真实的玻璃杯子 Create a glass with Blender and Mitsuba
Scene and render settings 场景和渲染设置
For this render we'll use a photon mapping integrator, which works better in a closed room, so add some planes (assign diffuse material) around the scene as in the image below, set the camera and add a sphere inside the scene (emission material).
对于这个渲染我们将使用整合的光子贴图(photon mapping),这个对封闭的室内空间更好,所以在场景周围添加一些平面(指定默认的材质)如下图,设置相机,并在场景里添加一个球体(发光材质)。
In the render tab choose Photon Mapper and press F12 to start the render. If the result is too noisy try to increase the photon number and/or samples (in my work I used 96 pixels-per-samples).
在渲染选项卡中选择光子映射(Photon Mapper),然后按F12开始渲染。如果结果太多噪点尝试增加光子数和/或采样(在我的工作中,我用96每像素采样) 。


 回复: 使用Blender和Mitsuba创建真实的玻璃杯子 Create a glass with Blender and Mitsuba
Top tip: Post-production with Gimp 使用Gimp后期制作
Open the image with Gimp, adjust the curves then duplicate the layer. Add a Gaussian blur (20-pixels) on the new layer and set blend mode to ADD.
使用Gimp打开图像,调整曲线( curves )然后复制层,在新的层添加一个高斯模糊(Gaussian blur 20像素),然后设置混合模式( blend mode)为相加(ADD)。

Related links
Check out Filippo's website
To follow Filippo's tutorials, you can download the open source software Blender and Mitsuba
Open the image with Gimp, adjust the curves then duplicate the layer. Add a Gaussian blur (20-pixels) on the new layer and set blend mode to ADD.
使用Gimp打开图像,调整曲线( curves )然后复制层,在新的层添加一个高斯模糊(Gaussian blur 20像素),然后设置混合模式( blend mode)为相加(ADD)。

Related links
Check out Filippo's website
To follow Filippo's tutorials, you can download the open source software Blender and Mitsuba
您在这个论坛的权限:
您不能在这个论坛回复主题
